 N O T I C E
MSPbots WIKI is moving to a new home at support.mspbots.ai![]() to give you the best experience in browsing our Knowledge Base resources and addressing your concerns. Click here
to give you the best experience in browsing our Knowledge Base resources and addressing your concerns. Click here![]() for more info!
for more info!
N O T I C E
MSPbots WIKI is moving to a new home at support.mspbots.ai![]() to give you the best experience in browsing our Knowledge Base resources and addressing your concerns. Click here
to give you the best experience in browsing our Knowledge Base resources and addressing your concerns. Click here![]() for more info!
for more info!
The integration of MSPbots and ConnectWise Manage allows you to manage all aspects of your IT department and system with Business Intelligence (BI) automation and real-time reporting. Use this article as a guide for setting up the connection of ConnectWise Manage On-Premise to MSPbots. Once connected, you can start utilizing MSPbots solutions with ConnectWise to track time, tickets, and communication, manage projects, get real-time visibility into your company's health, and run your IT department more efficiently.
What's on this page:
Prerequisites
You must have the following to ensure a successful connection between MSPbots and Kaseya VSA:
- A new read-only account in your SQL Server or MySQL for communicating with MSPbots
- Advanced knowledge of SQL databases and scripts
- Admin role for modifying the settings in the MSPbots app
How to establish the MSPbots integration with Kaseya VSA
1. Connect the MSPbots agent.
Use this integration setup option only if you are an advanced user with knowledge of SQL databases and scripts. For more information on connecting your software to MSPbots using API or SQL agent, refer to Reminders for Connecting to MSPbots via API or SQL Agent.
- Go to Integrations on the MSPbots app menu.
- Find the ConnectWise Manage On-Premise and click the Config icon.

- Next, click the download icon for the MSPbots SQL Agent Client to start downloading the installer file.

- After the download completes, follow the prompts to install the MSPbots SQL Agent Client.
- During the setup, select Automatic Start and Create a desktop shortcut, then click Next.

- In the last step, select the Launch MSPbotsAgentService checkbox and click Finish. The window will automatically close when the service starts.

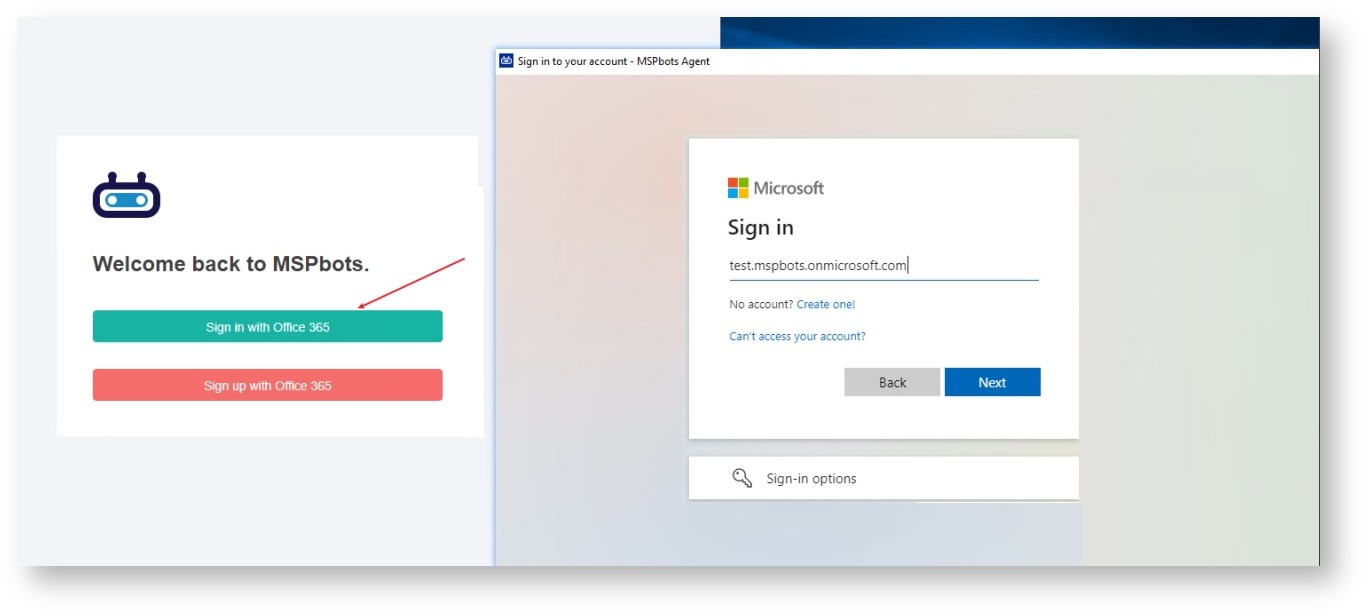
- Launch the MSPbots agent and log in using your MSPbots account. You can minimize or close the window after login but do not log out.
2. Set up the MSPbots Agent Connector.
- Go to Integrations on the MSPbots app menu.

- Search for ConnectWise Manage On-Premise and click it to open the connection settings.

- Click the +Add Connector button.

The last success auth shows the last time when the MSPbots Agent successfully pulled the database configuration information. This process is set to occur every 5 minutes by default.
- Fill in the following required fields.
- Database Type - Select either SQL Server or MySQL.
- Agent - This field is populated automatically with the name of the installed machine.
- IP - Provide the internal IP address or FQDN of the SQL or MySQL server.
- Database Name
- Time Zone - Select the time zone used by the connected database.
- User ID - This is the username of the user with read-only access to the database.
- Password - This is the password of the user with read-only access to the database.

It may take a few moments for the agent to check in after installation.
If you have installed multiple MSPbots agents with different databases in different network segments, you have to select the device name where you manually installed the MSPbots Agent. You can find the device name in the Agent selection box. Select the one under the corresponding gateway of the database. - Click Save and Sync.
- Go to Integrations on the MSPbots app menu.
3. Create a dataset and validate the data.
- Go to Datasets on the MSPbots app menu and click the New Agent Dataset button.

When the New window appears, click Integration and select ConnectWise Manage On-Premise. Don't forget to fill in the dataset Name and Description fields.

- Next, go to the Data Cleaning tab to show the Validate SQL section below.
- Select a database from the DB dropdown list.

- Scroll down to the Validate SQL section and fill in the SQL field. The most common SQL statement here is “select * from TABLENAME”.
- Input your desired Sync Frequency in minutes.
Sync Frequency is currently limited to 30 minutes and can only be decreased for smaller datasets. For larger datasets, the frequency may be limited due to a large amount of data ingestion and the constraints it would place on both your server and ours.

- Select a database from the DB dropdown list.
- Click Confirm when done. This will show a preview of the data for your validation. You can customize or use the default character length for string-type fields, and the time field can be set with a timezone.

- Confirm if the data is correct, then click OK to create and save the dataset. The data will be synchronized in 10 minutes.
- Go to Datasets on the MSPbots app menu and click the New Agent Dataset button.
4. Save the logs and send the file to the MSPbots Support Team.
- Open the MSPbots Agent client and click the Save Log button on the upper right corner of the window.

- Click Confirm in the Tips pop-up window.

- Next, select the location to save the logs, provide a filename, and click Save.
- Send the file to support@mspbots.ai.
- Open the MSPbots Agent client and click the Save Log button on the upper right corner of the window.
Related Topics
Overview
Content Tools
N O T I C E
MSPbots WIKI is moving to a new home at support.mspbots.ai![]() to give you the best experience in browsing our Knowledge Base resources and addressing your concerns. Click here
to give you the best experience in browsing our Knowledge Base resources and addressing your concerns. Click here![]() for more info!
for more info!