 N O T I C E
MSPbots WIKI is moving to a new home at support.mspbots.ai![]() to give you the best experience in browsing our Knowledge Base resources and addressing your concerns. Click here
to give you the best experience in browsing our Knowledge Base resources and addressing your concerns. Click here![]() for more info!
for more info!
Page History
You You can create dashboards with specific data to highlight action items and metrics that help achieve and measure business goals specific to your business needs. Once created, you can stream your dashboard on a screen, use the snapshot function, and send the data as a report based on a schedule, among others.
...
Peer Groups - Dashboards are helpful in trend analysis, benchmarking, goal tracking, and knowledge-sharing.
Relevant applications and permissions
...
You can set up dashboards for all MSPbots apps, BI packages, and applicable integrations. Only users with admin permissions can create dashboards and reports. If you don't have enough permissions, contact your administrator for help.
...
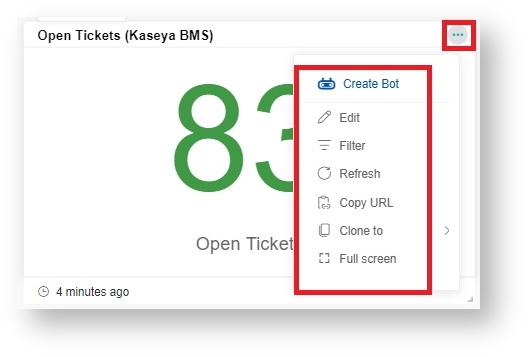
- Hover the cursor over and select Edit, Filter, Refresh, Copy URL, Clone to, or Full screen.
- Edit - Edits the widget
Filter - Adds filtering conditions to the widget
Refresh - Refreshes the data on the widget
Copy URL - Copies the URL address of the widget
Clone to - Clones the widget and has options to Clone to "My widgets", Clone to existing dashboards, and Clone to new dashboard.
- Full screen - Displays the widget in full screen
- After you have finished configuring, click Save Dashboard to save the settings.
What other actions can I do on the dashboard?
...
- Other optional settings:
- Design - Click to configure the widgets of the dashboard. For detailed design instructions, please refer to: HowtoConfigureWidgetsinaDashboard.
- Edit - Click to edit the basic information of the dashboard.
- Setting - Select whether to fit the widgets size to match the page height.
- Refresh - Click to refresh all widgets. Hovering here for 2 seconds will open the auto refresh settings.
Tip When the auto-refresh feature is enabled and the refresh interval is set, the following rules will apply:
- Upon entering the dashboard page:
- If the current time is equal to or later than the last refresh time plus the auto-refresh interval, the page will refresh automatically, and a new countdown will start from the current time.
- If the current time is earlier than the last refresh time plus the auto-refresh interval, no action will be taken. The page will refresh automatically when the set interval is reached.
- While staying on the dashboard page, it will adhere to the auto-refresh interval you have set and automatically refresh at the designated time.
- Once you leave the dashboard page, the automatic refreshing of the page will stop.
For example, let's say the last refresh time was 9:00, and the auto-refresh interval is set to 5 minutes.
- If you access the dashboard page at 9:08, which is later than 9:00 + 5 minutes, it will automatically refresh once, and the new auto-refresh timer will initiate from 9:08. Please note that it will not automatically refresh at 9:05.
- If you access the dashboard page at 9:02, which is earlier than 9:00 + 5 minutes, no action will occur. If you remain on the page until 9:05, it will automatically refresh at precisely 9:05. However, if you leave the page before 9:05, the last refresh time will remain as 9:00.
- Upon entering the dashboard page:
- CLONE - Click to clone the dashboard.Please refer to How to Clone a Dashboard.
- Share - Click to share the dashboard. It supports sharing through a shareable link, Snapshot, Embed, Share to community and Stream to TV. Please refer to:
- Delete - Click to delete the dashboard.
- Presentation - Click to select one of the three ways to display the dashboard.


