 N O T I C E
MSPbots WIKI is moving to a new home at support.mspbots.ai![]() to give you the best experience in browsing our Knowledge Base resources and addressing your concerns. Click here
to give you the best experience in browsing our Knowledge Base resources and addressing your concerns. Click here![]() for more info!
for more info!
N O T I C E
MSPbots WIKI is moving to a new home at support.mspbots.ai![]() to give you the best experience in browsing our Knowledge Base resources and addressing your concerns. Click here
to give you the best experience in browsing our Knowledge Base resources and addressing your concerns. Click here![]() for more info!
for more info!
This process is the easiest way to create a bot from any report | widget containing the data you want the bot to monitor and report to you. Consider the following tips before continuing;
- email field included in the data or drill through, whether you want the bot send alert messages thru email or teams chat and/or channel it is needed
- alert message constructed before starting the bot creation process
- escalation message if required
Steps in creating bot from widget
1. Open the report and/or widget you want to use for the bot you want to create. Locate the Bot icon: ![]() to initiate the bot creation. Always click this icon on any widget in MSPBots app if you want to create a bot using the data in the widget.
to initiate the bot creation. Always click this icon on any widget in MSPBots app if you want to create a bot using the data in the widget.

2. Provide a descriptive name for the Bot and Roles for each type of user allowed to access the bot. A nice description for the bot is also suggested. Click the Confirm button once ready to move to the next step.

3. On the Bot creation screen, click Design

4. Set up the Trigger script:
- The widget name will be automatically provided, this is the name of the widget where you started the bot creation.
- Set additional filter when required.
- Click the Data Inspector icon if you want to preview the data available.
- Set the Schedule run for the bot.
- Click the Next button to continue with the next step.

5. Select where you want the Bot to send the Alert message. Please note you can select several channels where you want the bot to send the alert message.
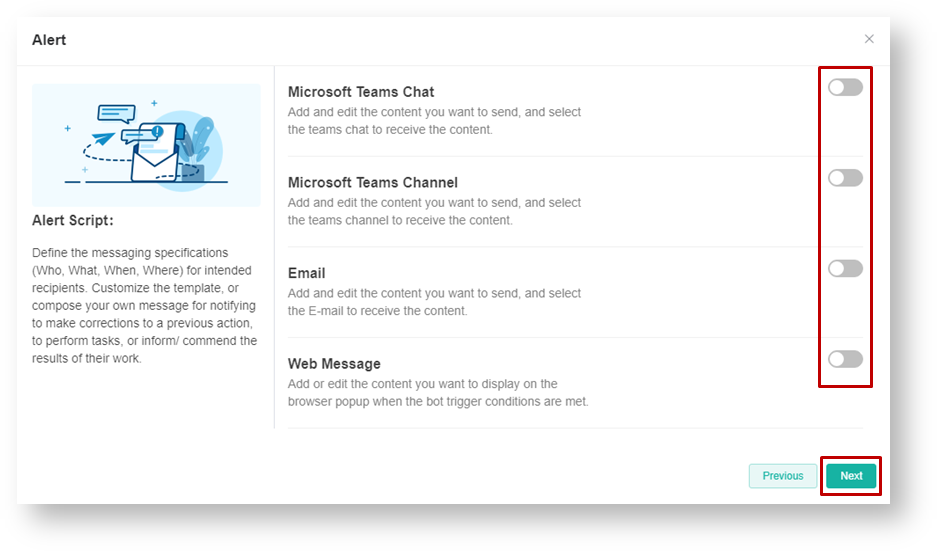
6. Set up the Alert message. Almost all alert messages contains the followiing;
- To email receiver
- Subject and Message content, use the Insert a Token icon to select the data you want to include in the message. You can use the formatting icons to make the messages stand out.
- Click the Next button to continue with the next step.

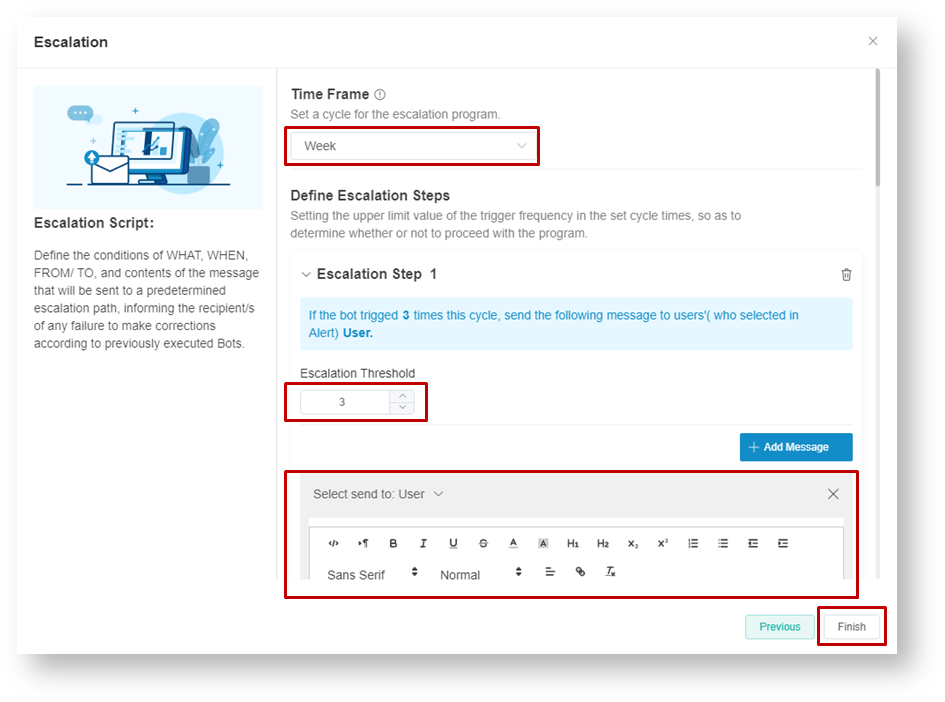
7. Set Escalation script. Take note that the escalation recipient can be another user, manager and/or next level manager as per your required setup. And you can set several escalation steps when required.
- Set the Escalation time frame: Day | Week | Month
- Define escalation steps. Click the + Add Message button when required.
- Set Escalation threshold.
- Set the Escalation message.
- Click the Finish button when done.
How to turn ON the Bot?
- Turning ON the Trigger switch will let the bot prepare all alert messages but not sent.
- Turning ON the Alert switch will instruct the Bot to send the alert message to any recipient set in the Alert script screen.
- Turning ON the Escalate switch will instruct the Bot to send escalation messages to target user, managers, etc.

How to check if the Bot is firing and sending alert messages?
- Check the Detail tab under Recent Run History.

- Check the Run History for the successful runs. Other option includes All Runs, Only Successful Runs, Failed and Running.

- Check the Bot messages generated. These are the actual messages generated by the bot.

Overview
Content Tools
N O T I C E
MSPbots WIKI is moving to a new home at support.mspbots.ai![]() to give you the best experience in browsing our Knowledge Base resources and addressing your concerns. Click here
to give you the best experience in browsing our Knowledge Base resources and addressing your concerns. Click here![]() for more info!
for more info!