 N O T I C E
MSPbots WIKI is moving to a new home at support.mspbots.ai![]() to give you the best experience in browsing our Knowledge Base resources and addressing your concerns. Click here
to give you the best experience in browsing our Knowledge Base resources and addressing your concerns. Click here![]() for more info!
for more info!
Page History
| Note | ||
|---|---|---|
| ||
Before adding a slicer to the dashboard
|
Pre-requisite:
...
|
...
Note: To know more on how to setup different types of slicer, kindly visit the following wiki link:
...
Refer to the following resources for information on setting up slicers: |
...
How to create a Date Range Slicer |
...
To add a slicer
...
on the
...
dashboard
- Navigate to Dashboardson the MSPbots app.
...
- Search for the dashboard that needs updating.
...
3. Search your specific dashboard to update

...

- Click the dashboard to open. Let's use the dashboard below as an example. We will add a company slicer to filter
...
- the device count for each company.
...

...
- Add
...
- a slicer.
...
- Start by clicking the Design button on the upper right section of the screen.

6. Click Add Widget

7. Click Slicer Lists. Then, search your specific Slicer (either at My Slicer or Slicer Template Tab).

Note: To setup a slicer, kindly check the link above under the pre-requisite section.
8. Select your Slicer. Then, click Add

...

- Next, click Add Widget.

- On the Add Widget window, click Slicer List then search for the slicer you want to use. You can search from either the My Slicers or Slicers Template tab.

Refer to How to Create Slicers in Widgets for help with setting up slicers. Select your chosen slicer and click Add.

...
The slicer is now added to your dashboard.

...

Note title Important To make the slicer work successfully with the other widgets
...
on the dashboard
...
, you need to update all the
...
widgets and add the slicer as one of its
...
filters in the setup.
...
Please be guided by the steps below.
...
To add the slicer
...
to the widget
...
:
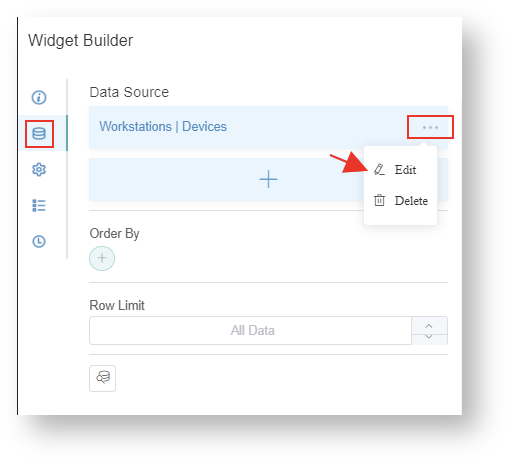
- Click the ellipsis ...
...
- icon on the widget and select
...
- Edit.
...

- Click the Dataset icon, then click the ellipsis

...
- ...
...
- and
...
- select Edit.

...
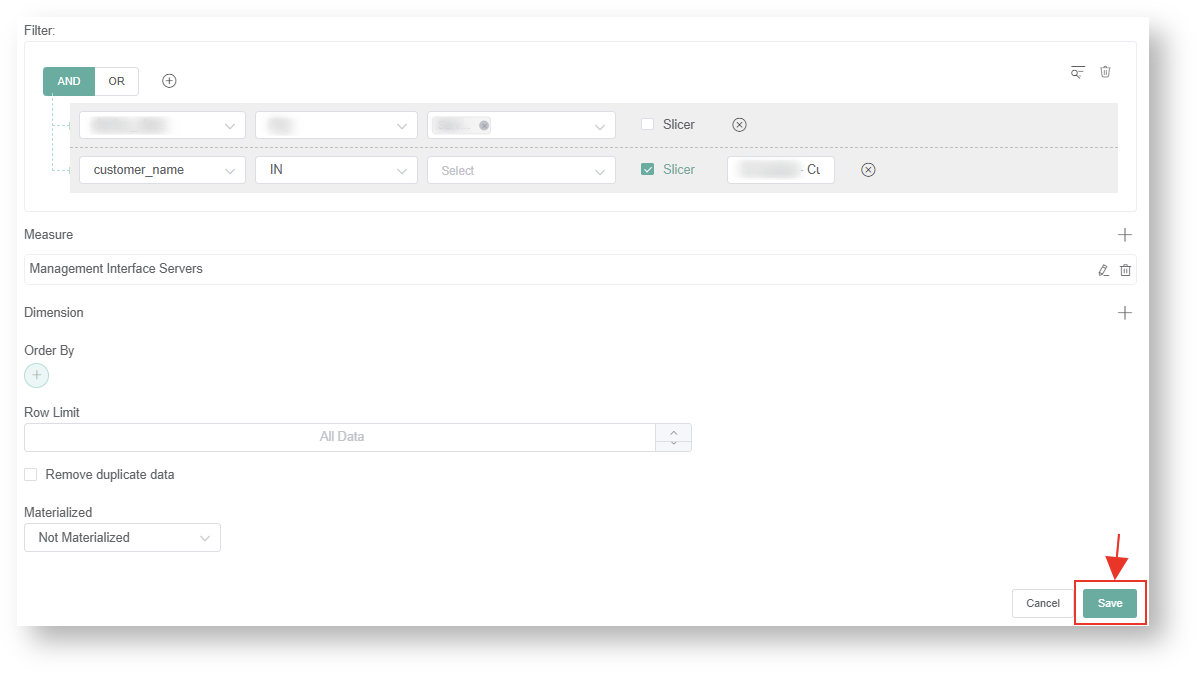
- Go to the Filter section.
...
- Add a new condition
...
- by clicking
 > + Add Condition.
...

13. Click AND. Then,
...

- Next, click the AND tab and do the following:
- Select the column name for the slicer
...
- .
...
- Example: customer_name
...
...
- Select IN as the query string.
...
c. Check slicer Checkbox.
...
- Tick the Slicer checkbox.
- Click the Slicer field
...
- and select the
...
- slicer
...
- for the
...
- corresponding integration.
...
Choose a Slicer setup.
...
Example: Customer slicer
...

...
Note Do not select the OR
...
operator for
...
slicers.
...
- Click the Save button
...
- to save the changes.
...
...
- Finally, on the Widget Builder window,
...
- click Apply to enable the
...
- slicers setup
...
- on the widget.
 16. Depending on the number of widgets you have in the dashboard.
| Note |
|---|
You have to repeat steps 10-15 for all the widgets |
...
on the dashboard to apply the slicer (e.g., company_name) |
...
and make sure it works on all |
...
widgets. |
Overview
Content Tools