 N O T I C E
MSPbots WIKI is moving to a new home at support.mspbots.ai![]() to give you the best experience in browsing our Knowledge Base resources and addressing your concerns. Click here
to give you the best experience in browsing our Knowledge Base resources and addressing your concerns. Click here![]() for more info!
for more info!
Page History
The following provides you are the steps on how to setup your Addigy api set up the Addigy API and integrate it with MSPBOTsMSPbots.
...
To set up the Addigy integration with MSPbots:
- Generate the Addigy API Key and Secret
...
1. Create an API Credentials for your Addigy integration. Follow the steps in Generating Addigy API Key and Secret – Addigy.
1.1. API name should be: ????
1.2 Take note of the Client ID and Client Secret
| Note |
|---|
Copy and store your Client ID and Client Secret. It will not be available again once the configuration is complete. For security purposes. |
2. Next, connect your addigy API to MSPBots.
Connect your Addigy API to MSPBots
1 Login and go to MSPBots > Integration menu.

2. Search and select the "Addigy" integration


3. Key in your Client ID and Client Secret

...
- .
- Log in to Addigy and expand Account on the navigation pane.

- Select Integrations and click the + Add API button.
- Input a name under the Add API Key section (e.g., MSPbots) then click Save.

- A pop-up message with the Client ID and Client Secret appears. Take note of this information.

- Check the new integration setup in Account > Integration.
- Log in to Addigy and expand Account on the navigation pane.
- Get the Site URL.
- Click Settings on the far right-hand side of the Addigy screen.
- Copy the URL shown in the slide-out panel. This is the site URL for Addigy.
Note: You may be asked for a Domain other than the Client Key and Secret. The domain is the Addigy realm like prod.addigy.com where you created the key.
- Connect the Addigy API to MSPbots.
- Log in to MSPbots and navigate to Integrations.

- Select Addigy and key in the Site, Client ID, and Client Secret.
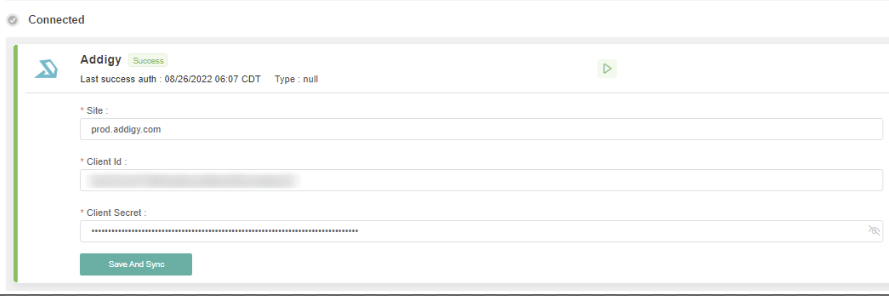
- Log in to MSPbots and navigate to Integrations.
- Click Save and Sync button.
Overview
Content Tools