 N O T I C E
MSPbots WIKI is moving to a new home at support.mspbots.ai![]() to give you the best experience in browsing our Knowledge Base resources and addressing your concerns. Click here
to give you the best experience in browsing our Knowledge Base resources and addressing your concerns. Click here![]() for more info!
for more info!
Page History
The NextTicket Manager is an automated ticket dispatch system that helps technicians and dispatchers identify the ticket that will be worked on next based on a combination of a pre-defined scoring system and rules. The NextTicket Manager for Kaseya BMS is specifically designed for Kaseya BMS users who want to achieve more efficient ticket prioritization and management. For more information on NextTicket and how it works, read the article What is NextTicket Manager?
What's on this page:
Table of Contents maxLevel 10 minLevel 2 style none
Why should I use the NextTicket Manager for Kaseya BMS?
...
The NextTicket Manager for Kaseya BMS has the following benefits for your MSP:
- Automatic and unbiased ticket dispatching - Tickets are automatically dispatched based on a point system and priority rules. This ensures that dispatchers and technicians assign and work on tickets objectively, according to approved priority, importance, and time criticality.
- Prioritization based on company requirements - The priority rules and point system that define NextTicket prioritization are based on the priorities, importance, and criticality approved by the company. This improves the speed and accuracy of ticket assignment and prioritization remarkably. As a dispatcher, you save 80% of your time allotted for assigning tickets and see the highest ticket priority for each technician based on their skill set.
- Quick identification of next tickets - As a technician, you can quickly identify the tickets you should work on next and monitor tickets scheduled for the day on the same page. You can also reject a ticket if you cannot work on it yet as long as you provide a valid reason for rejection.
Who can use the NextTicket for Kaseya BMS app?
...
This app is available to the following:
- Kaseya BMS users with a working integration with MSPbots

- Technicians and dispatchers within the company's active directory
- Administrators with admin permissions for setting up the filters, points system, and priority rules
| Note |
|---|
The Priority Rules must be set up properly for NextTicket to function successfully. Only admin users can modify priority rules on the Settings tab. Optional: Add companies to the Watch List. |


Accessing the NextTikcet Manager for Kaseya BMS
...
Follow these steps to access the NextTicket app for Kaseya in MSPbots:
- Open the MSPbots app.
- Click Apps on the left pane.
- When the Apps tab opens, search for NextTicket for Kaseya BMS and click it to open.
FOR ADMINS: Setting up NextTicket
...
| Note |
|---|
Only Admin users have permission to adjust the settings of the NextTicket app. |
How to set the ticket filter
You can set filters to narrow down the tickets applicable to each technician.
To set the ticket filter, follow these steps:
- On the NextTicket for Kaseya BMS screen, select the Tickets filter list, and then click Add New Filter.
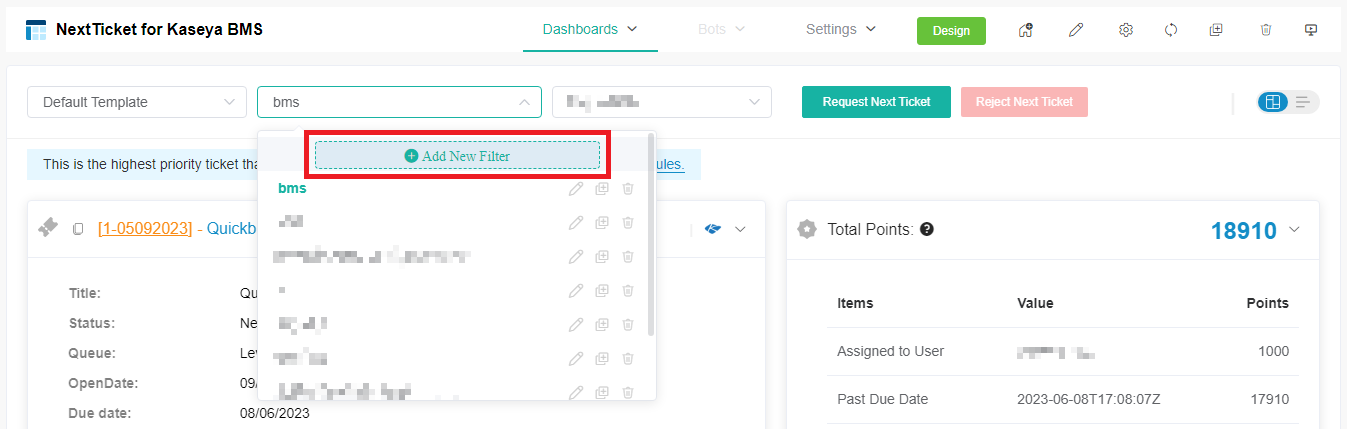
- When the Filter Settings window opens, enter a name for your filter in the Filter Name box.
- Next, add a condition for your filter by selecting the appropriate filter type from the Select Fields list.
- To complete your condition, enter additional details in the two new fields or lists that appear beside the Select Fields dropdown.
- When you're done setting up the filter, click Save.
If you want to add more groups or conditions for the filter, click and then select either Add Group or Add Condition.
You can also click Preview to check if your new filter settings or conditions are valid before you save the changes.
For more information on NextTicket filters, read the article How to Setup Filters for NextTicket Manager.
How to delete filter conditions
Filter conditions are deleted in the Filter Settings window.
- To delete filter conditions individually, click
 corresponding to the filter condition that you want to delete.
- To delete all filter conditions at once, click
 and then click Clear All.
How to reject a technician's ticket
The next priority ticket and its details appear after you select a filter and a user on the NextTicket for Kaseya BMS screen. If you think that this ticket should not be the user's next top-priority ticket, reject the ticket and specify the reason why the user can't work on it.
To reject the top priority ticket of a user, follow these steps:
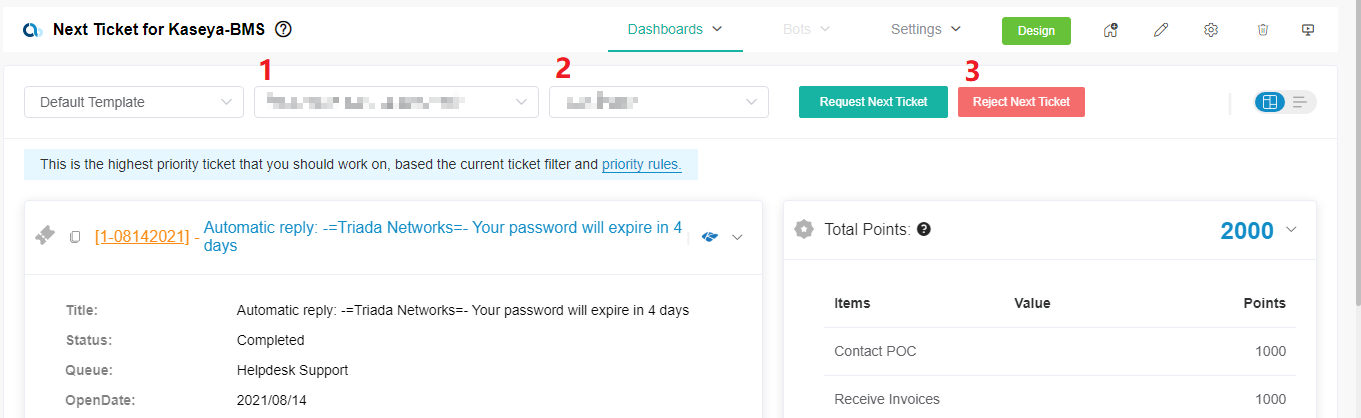
- On the NextTicket for Kaseya BMS screen, select the applicable filter from the Tickets filter list.
- Next, select the technician's name from the User list to view details of the assigned next top-priority ticket.
- Review the details and click Reject Next Ticket.
- When the Reject Ticket window opens, select or type the reason for rejecting the ticket, and click Save.

FOR ADMINS: Setting up the point system for priority rules
...
You can define the point system for the NextTicket for Kaseya BMS priority rules to calibrate the prioritization of the tickets.
Anchor priorityrules priorityrules
How to set up the point system
| priorityrules | |
| priorityrules |
- Click Settings on the NextTicket for Kaseya BMS screen, and select NextTicket For Kaseya BMS Priority Rules.
- Go to the Tickets filter and User fields and select the options that apply to your requirements.

- Next, set up the priority rules. Let's set the Priority Type rule as an example.
- Select a ticket priority type from the If ticket priority = field.
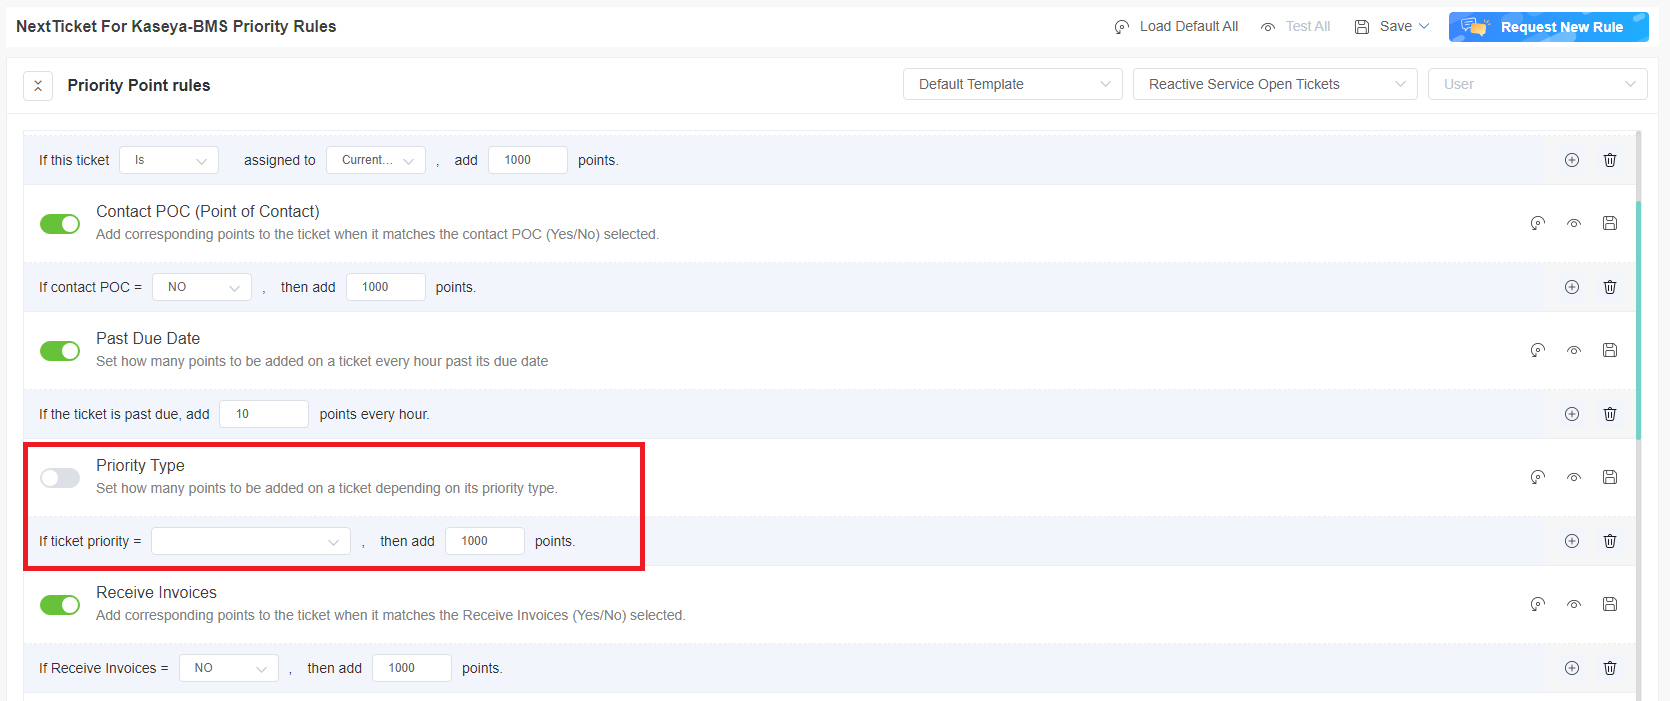
- Then in the add points field, enter the number of points that will be given to tickets that meet the condition selected in Step 3a.
- Do the same for the other rules you want to configure. Refer to the section on the priority rules and functions below to determine which rules meet your requirements.
The rows of priority rules are expanded by default. You can click the Priority Point rules switch to collapse all rows.
- Select a ticket priority type from the If ticket priority = field.
- You have the following options after setting up each priority rule:
- Enable the rule you have set by clicking the corresponding toggle
 switch.
- Load the rule's default value. Click the Load Default
 icon.
icon. - Click the Save & Test
 icon to save the changes for the specific priority rule and to test the values of the rule.
 - Save your changes on the rule by clicking the Save
 icon.
icon. - Delete the rule and click the Delete
 icon to delete the rule.
- Enable the rule you have set by clicking the corresponding toggle
- Do any of the following options after setting up all your preferred priority rules:
- Test the calculation result for all the priority rules. Click Test All.
- Load the default values for all the priority rules. Click Load Default All.
- Save the changes for all the priority rules. Click Save and select Save All.
- Click Save and select Save Rule as Template to save the changes for all the priority rules as a template.In the Save Rule as Template window,set the Template Name and click Save.
Best Practices in setting the priority rules
- Interview your dispatcher or technician to identify rules and conditions like this: If <given scenario>, then it should be given more (or less) importance.
- Review each of the point rules you have identified. Use the Save & Test function to test each rule.
- Use the Test all function to balance the points between the rules and check if the prioritization brings up your expected result.
- Ask your technicians to try the NextTicket Manager for Kaseya BMS app and give you feedback.
- Adjust the rules and points based on the dispatcher's or technicians' feedback.
- Continue updating the rules and corresponding priority points for two weeks. The resulting prioritization should improve over time until you don't need to modify anymore.
- Request and create new rules that are unique and not duplicates of existing ones.
Anchor priorityrulesfunction priorityrulesfunction
What are the NextTicket priority rules and functions?
| priorityrulesfunction | |
| priorityrulesfunction |
Below are the priority rules and descriptions of how each rule functions. For information on how to activate, test, save, delete, and request priority rules, read the article NextTicket Manager Priority Rules.
| Priority Rule | Function |
|---|---|
| Account Type | Adds corresponding points to the ticket when a ticket matches the account type selected |
| Assigned to User | Adds the indicated points if the ticket is assigned to the current user |
| Contact POC (Point of Contact) | Adds corresponding points to tickets that match the identified Contact POC (Yes/No) |
| Past Due Date | Adds the indicated points to a ticket every hour past its due date |
| Priority Type | Adds the indicated points to tickets with the selected priority type |
| Receive Invoices | Adds corresponding points to a ticket when it matches the selected Receive Invoices (Yes/No) |
| SLA Resolution Expiration Time | Adds corresponding points to the ticket if its expiration matches the specified number of minutes before or after the SLA resolution expiration time |
| SLA Response Expiration Time | Adds corresponding points to the ticket if its expiration matches the specified number of minutes before or after the SLA response expiration time |
| Secondary Assignee | Adds corresponding points to the ticket depending on the Secondary Assignee(s) field |
| Service Call Schedule Expiration | Adds points when the Service Call Schedule Expiration of the ticket matches the specified number of minutes before (Include the minute) or after (Not include the minute) the start or end time |
| Ticket Age | Adds corresponding points to a ticket for every min/hour/day that has elapsed from the Creation Date |
| Ticket Last Activity Update | Adds points to tickets ticket if the last activity update was updated |
| Ticket Status vs User | Adds corresponding points to a ticket if it has the identified Ticket Status and the indicated User requested to handle the ticket |
| Time In Status | Adds corresponding points to a ticket when it has been in a selected status over a given duration |
| Time from Last Update | Adds the indicated points to a ticket every hour past its last update time |
Related Topics
- Configuring NextTicket Priority Rules According to Requirements
- Assigned User Due Date Priority Rule for NextTicket
Anchor watchlist watchlist
FOR ADMINS: Add companies to the watch list
| watchlist | |
| watchlist |
...
Adding companies to your watch list allows you to give additional points to the tickets that they log so you can bump the priority of their tickets.
To add companies to the watch list, follow these steps:
- Go to the NextTicket for Kaseya BMS screen, and click Settings > Watch List for Kaseya BMS.

- When the Client Watch List for Kaseya BMS tab opens, click Add Company.
- In the Add Company window, select the checkbox for the companies you want to add.
- If you want to show and select only companies with an agreement, select the checkbox for Only show companies have an agreement. Don't forget to provide the reason for adding the selected companies in the Why add to the watch list? text box.
- Click Save when done adding.
For more information on using the Watch List, read the article How to use the Watch List in NextTicket Manager.
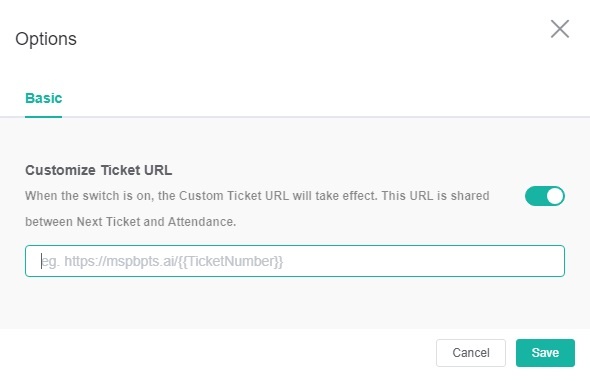
FOR ADMINS: Customize Ticket URL
...
- Go to Next Ticket for Kaseya BMS app.
- Click Settings> Options.
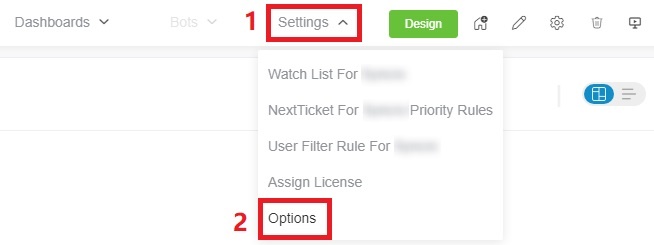
- When the Options tab appears, toggle the Customize Ticket URL switch and enter your custom ticket URL, replacing the actual ticket number with the {{TicketNumber}} token.
- For example, if the original ticket URL is https://manage.mspbotssample.com/v4_6_release/ConnectWise.aspx?locale=en_US&routeTo=ServiceFV&recid=5027470, and you want to customize the ticket URL to https://mtx.link/5027470, you need to enter https://mtx.link/{{TicketNumber}} in the "Customize Ticket URL" option. So, when you click on the ticket number, the link will point to https://mtx.link/5027470.
Tip The "Customize Ticket URL" feature is universal in the Attendance Manage and all NextTicket apps:
- If you toggle on the "Customize Ticket URL" switch in any one of the attendance management or all the NextTicket apps, the switch for this feature in the remaining apps will also be turned on. If you turn off the switch in any of these apps, the switch for this feature in the remaining apps will also be turned off.
- When you configured the "Customize Ticket URL" in any of these apps, it will be applied to all the remaining apps.
- If the "Customize Ticket URL" switch is turned off, the ticket links will remain as the originally generated links.
- For example, if the original ticket URL is https://manage.mspbotssample.com/v4_6_release/ConnectWise.aspx?locale=en_US&routeTo=ServiceFV&recid=5027470, and you want to customize the ticket URL to https://mtx.link/5027470, you need to enter https://mtx.link/{{TicketNumber}} in the "Customize Ticket URL" option. So, when you click on the ticket number, the link will point to https://mtx.link/5027470.
- Click Save to keep your settings.
FOR TECHNICIANS: How to use NextTicket
...
Viewing your top-priority ticket
As a technician, your next top-priority ticket is shown on theNextTicket for Kaseya BMS screen where you can also request or reject the next ticket assigned to you.
To view your top-priority ticket:
- Go to the NextTicket for Kaseya BMS screen and select a filter from the Tickets filter and User dropdown lists. The screen automatically refreshes and shows the details of your next top-priority ticket.

- Select either Dashboard View or List View to view the ticket details according to your preference.
Rejecting your top-priority ticket
If you think that your next top-priority ticket should not be yours, reject it and give the reason why you can't work on the ticket.
To reject your top-priority ticket:
- Go to the NextTicket for Kaseya BMS screen and select the applicable filter from the Tickets filter and User dropdown lists.

- Once the details of your top priority ticket appear on the screen, click Reject Next Ticket.
- When the Reject Reason window opens, provide the reason why you want to reject the ticket, and click Save.
For more information on how to use NextTicket, read the article What is NextTicket Manager?
Related Topics
...
| Content by Label | ||||||||||
|---|---|---|---|---|---|---|---|---|---|---|
|
Overview
Content Tools