 N O T I C E
MSPbots WIKI is moving to a new home at support.mspbots.ai![]() to give you the best experience in browsing our Knowledge Base resources and addressing your concerns. Click here
to give you the best experience in browsing our Knowledge Base resources and addressing your concerns. Click here![]() for more info!
for more info!
 N O T I C E
MSPbots WIKI is moving to a new home at support.mspbots.ai![]() to give you the best experience in browsing our Knowledge Base resources and addressing your concerns. Click here
to give you the best experience in browsing our Knowledge Base resources and addressing your concerns. Click here![]() for more info!
for more info!
The From field in MSPbots emails, notifications, and reports is customizable to use your company email instead of the default support@mspbots.ai. This article shows how to change the sender's email address using the OAuth2 method for more secure authorization.
What's on this page:
Background information
OAuth (Open Authorization) 2.0 is the modern standard to allow a website or application to access resources hosted by other web apps on behalf of a user. It adds security by providing consented access and restricting client actions performed on resources without sharing the user's credentials.
Now that basic authentication will be disabled and OAutho 2.0 is the new de facto industry standard for online authorization, MSPbots offers an option to add an extra authentication step in setting up the SMTP configuration for modifying the From field address for outgoing emails and sending reports. Users now have the option to use OAuth 2.0 in the Outgoing Mail settings.
If you prefer using only the basic authentication to modify the Outgoing Mail settings, refer to the article How to Configure the Outgoing Mail Using Basic Authentication.
Prerequisites for editing the Outgoing Mail settings
You must have the following to perform the procedure below:
- Admin permissions
- Inclusion in the Azure Active Directory (AAD)
- Outlook 365 license
- Application and developer roles for configuring the AAD
Gathering the MS OAuth 2.0 credentials for authorization
Follow these steps to generate the required information:
- Prepare the redirect uniform resource identifier (URI) which is https://app.mspbots.ai/web/um/smtp/redirect. Once the authorization is successful, Microsoft will use this URI to notify MSPbots about the authentication result.
You can find this information with the following steps:
Go to Settings > System > Outgoing Mail.
Click Addv and select OAuth2.
When the Add window opens, go to the Redirect URI field and copy the given URL.
- Sign in to the Microsoft Azure portal and secure the credentials needed for the OAuth 2.0 authorization.
Create a new app registration.
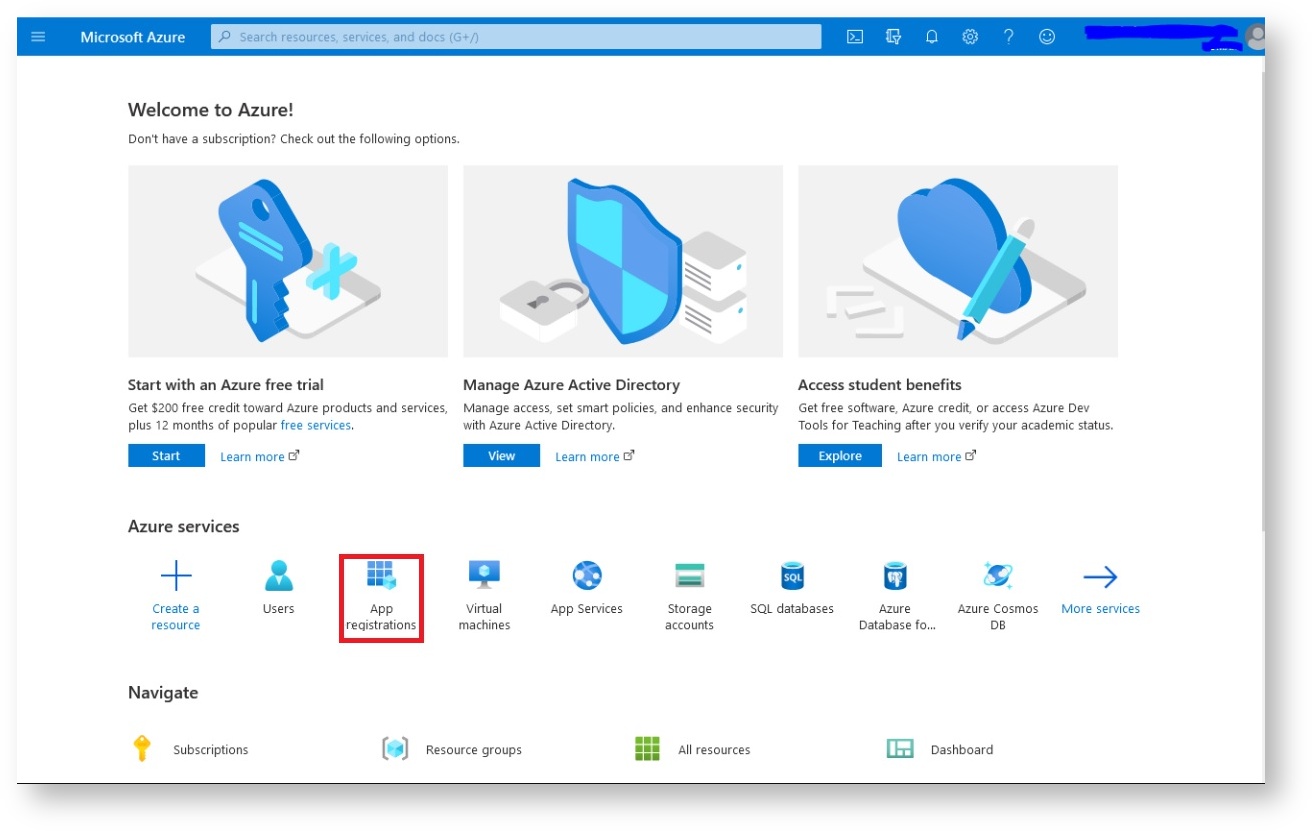
On the Microsoft Azure homepage, click App registrations. If you can't find App registrations on the Microsoft Azure homepage, please search in the search bar.
When the App registrations page opens, click the +New registration tab.
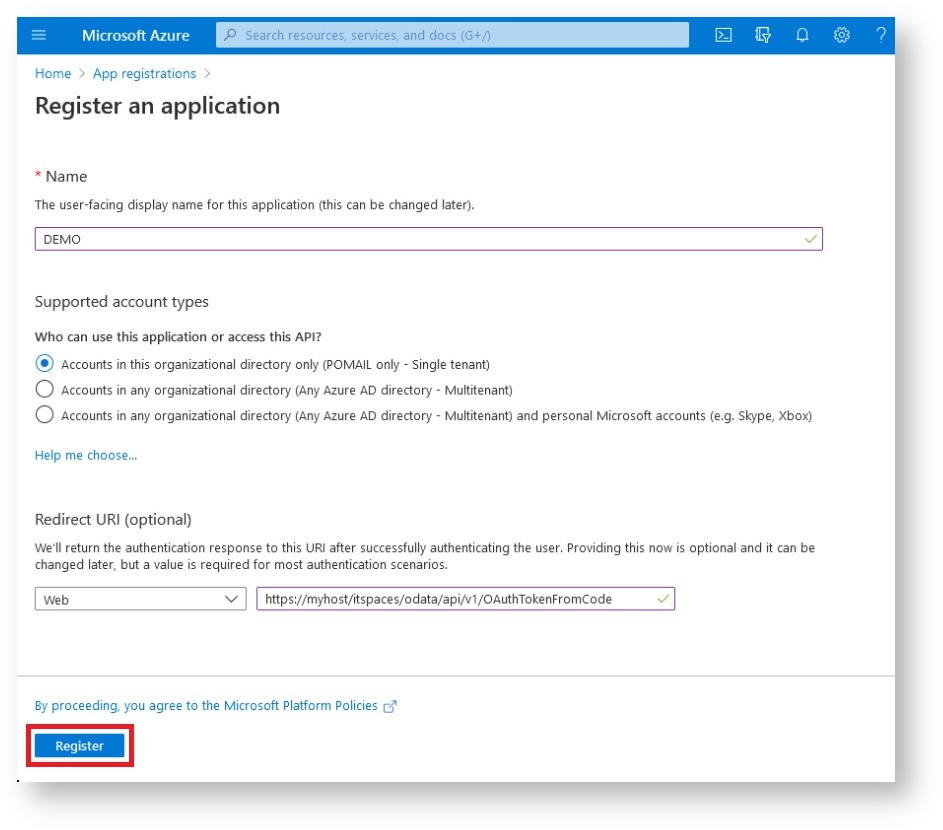
In the Register an application form:
Name - Enter a unique name for your application.
Supported account types - Select Account in this organizational directory only(MSPbots.ai only - Single tenant) from the options.
Redirect URI(optional) - In the first box, select Web and in the second box, enter the Redirect URI copied from Step 1.
Click Register.
The Application (client) ID will be shown after your registration is done. Take note of this ID. ---??
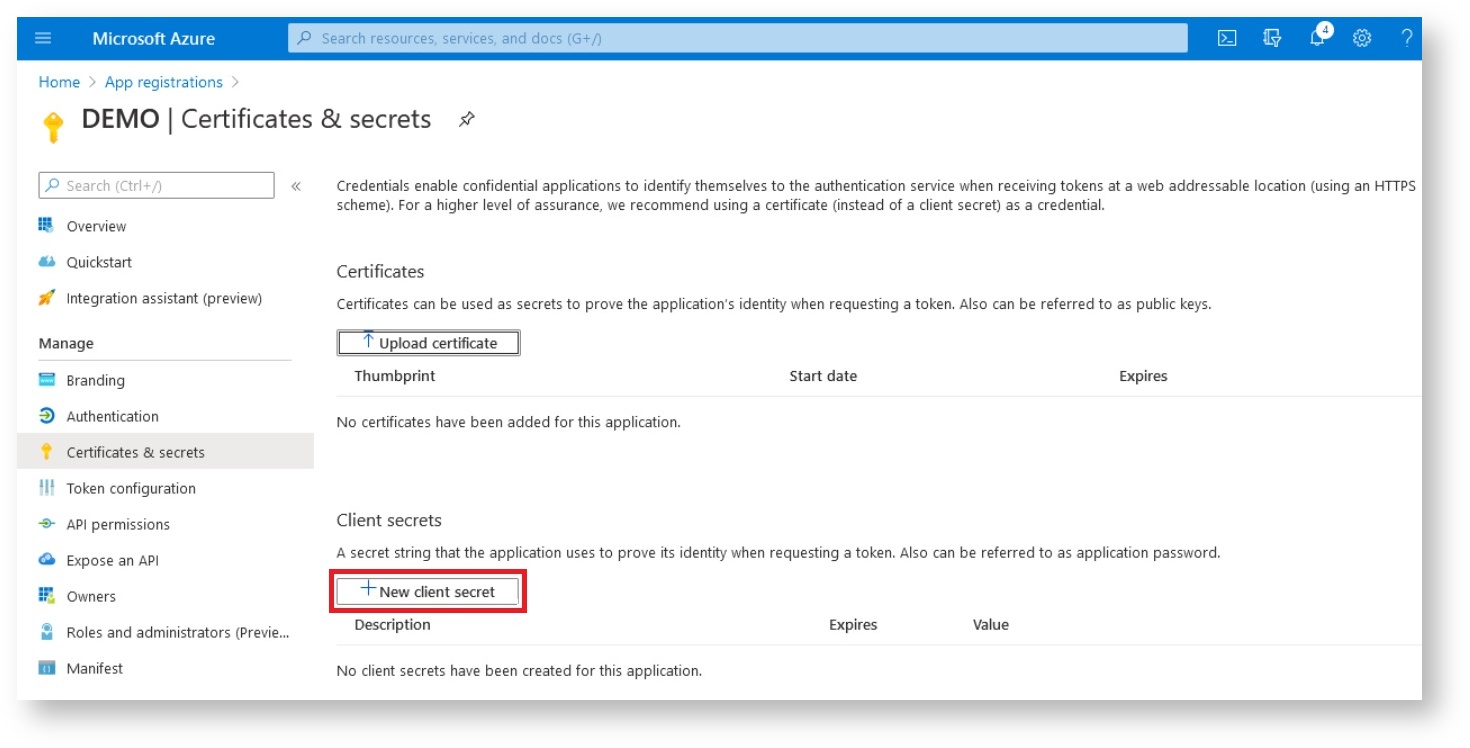
Next, go to Certificates & secrets in the sidebar menu, then在Client secrets tab下 click +New client secret on the right.
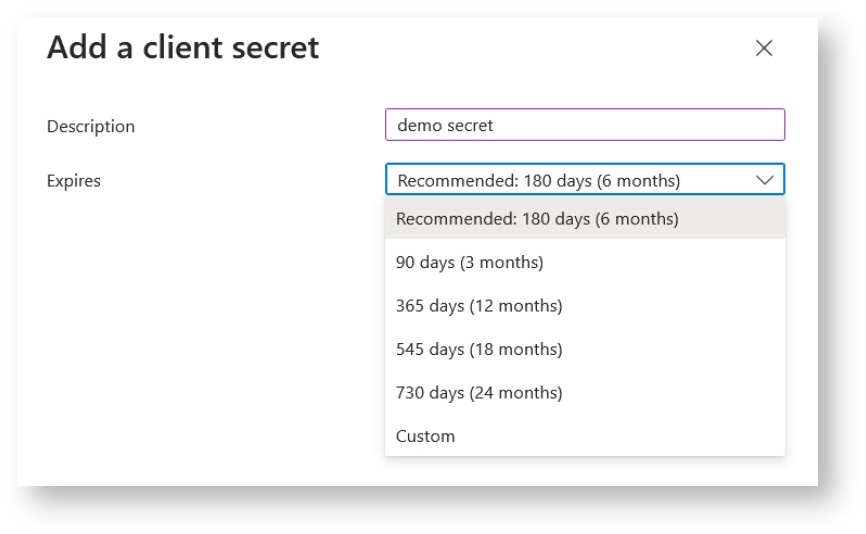
On the Add a client secret window:
Description - Add a description.
Expires - Select an expiry date from the dropdown menu.
Before the secret expires you must create a new secret and apply it to the MSPbots Outgoing Mail settings.
- Click Add located at the bottom of the Add a client secret window.
Once the Update application credentials popup appears in the top right corner of the page, the addition is successful.、
- Click the copy icon below the Value. You will need these values later when configuring OAuth 2.0 in the mail settings.
---换图
Next, go to API Permissions in the sidebar menu.
- Click the Add permissions button.
- Under the Microsoft APIs tab, select Microsoft Graph.
- Next, select Delegated permissions.
- Enter SMTP in the search bar under Select permissions, then click SMTP and check SMTP.Send.
- Enter IMAP in the search bar under Select permissions, then click IMAP and check IMAP.AccessAsUser.All.
- Click the Add permissions button.
- The permissions you added will appear in the Configured permissions list.
- Next, go back to the Overview and click the Endpoints tab.
- Copy the OAuth 2.0 authorization endpoint (v2) and the OAuth 2.0 token endpoint (v2) to your local desktop. You will also use these values for creating the OAuth 2.0 credential in the mail settings.
Setting up OAuth 2.0 in MSPbots
- Open the MSPbots app and go to Settings > System.
- Click Outgoing Mail in the upper right corner of the Settings tab.
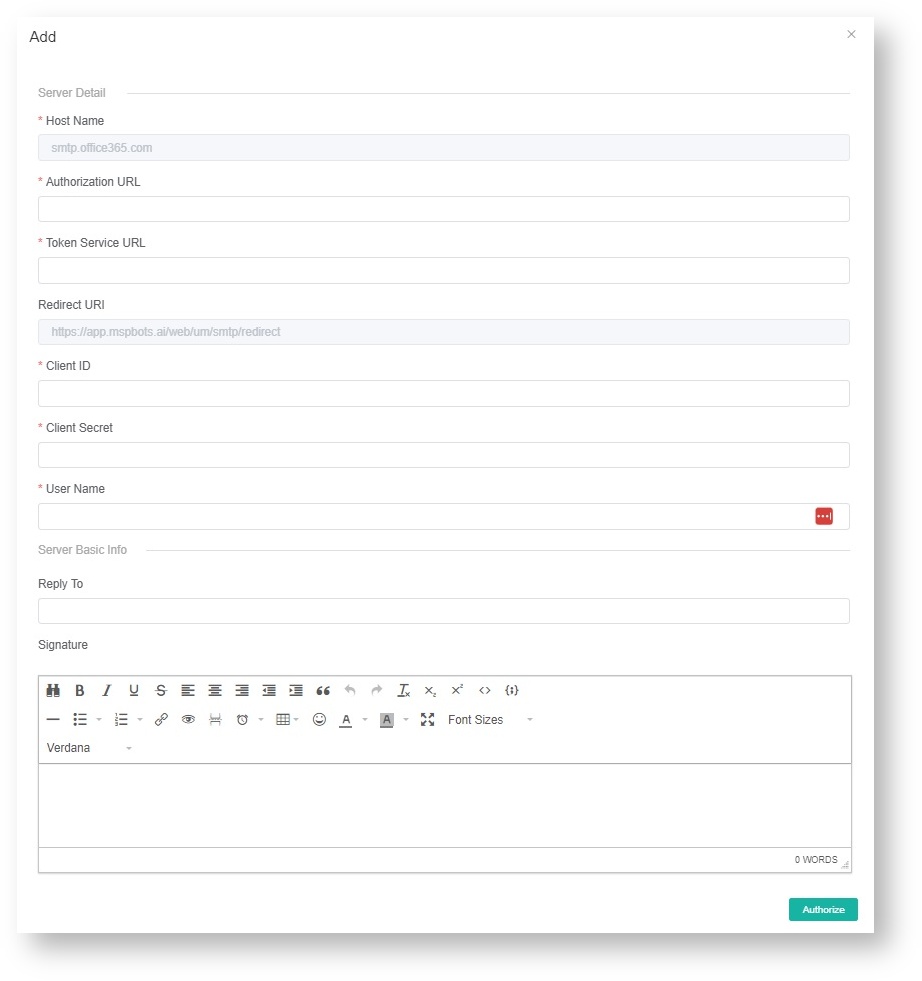
- Click Add and select OAuth2.
- Fill in the following fields:
- Host Name - Cannot be modified.
- Authorization URL and Token URL - Use the values from Step 3.h of the previous section.
- Redirect URI - This value is pre-filled.
- Client ID and Client Secret - et the values generated in Step 3.f of the previous section.
- Username - Enter your username.
- Reply to - Enter your preferred email.
- Signature - Input your signature.
- Click Authorize.
- When the confirmation pop-up window opens, click Continue.
- On the Microsoft login screen, enter the user password you provided in the OAuth 2.0 credential and click Sign In.
- Click Accept in the pop-up window with the requested permissions.
Verifying if the authentication is successful
To verify if the configuration works, refresh the mailbox list page. The mailbox status should show Verified for a successful authentication. If the status is Not Verified, repeat Step 4 onwards until the authorization is successful.
