 N O T I C E
MSPbots WIKI is moving to a new home at support.mspbots.ai![]() to give you the best experience in browsing our Knowledge Base resources and addressing your concerns. Click here
to give you the best experience in browsing our Knowledge Base resources and addressing your concerns. Click here![]() for more info!
for more info!
N O T I C E
MSPbots WIKI is moving to a new home at support.mspbots.ai![]() to give you the best experience in browsing our Knowledge Base resources and addressing your concerns. Click here
to give you the best experience in browsing our Knowledge Base resources and addressing your concerns. Click here![]() for more info!
for more info!
Slicers give users control over large datasets by applying filters that show or hide data. When a slicer on the MSPbots widgets is selected, filters are applied and users view only the data that is useful for their task or goal. This article shows the procedure for creating slicers that will allow clients to easily refine data for themselves.
Before you start, make sure that you are logged in to MSPbots with administrator permissions. Only an admin can create a new slicer.
Watch this video or follow the procedure below to create a slicer in widgets.
Follow these steps when creating slicers
- On the MSPbots app's menu, go to Settings > Slicer.

- Click the New Slicer button on the Slicer tab. This step opens the New Widget window.

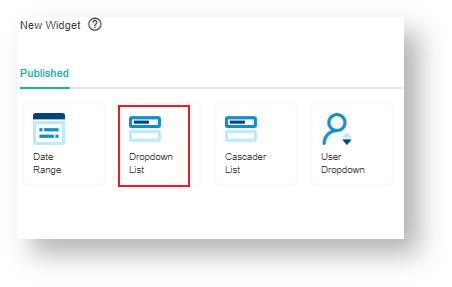
- Next, select the type of slicer that you require. For this example, we are selecting the Dropdown List slicer type. This action opens the Widget Builder window.
- When the Widget Builder window opens, provide the following:
- Name - Give the slicer a name.
- Description - Provide a short description.
- Role - Select the role/s that should have access to the slicer. Admin should be added by default.
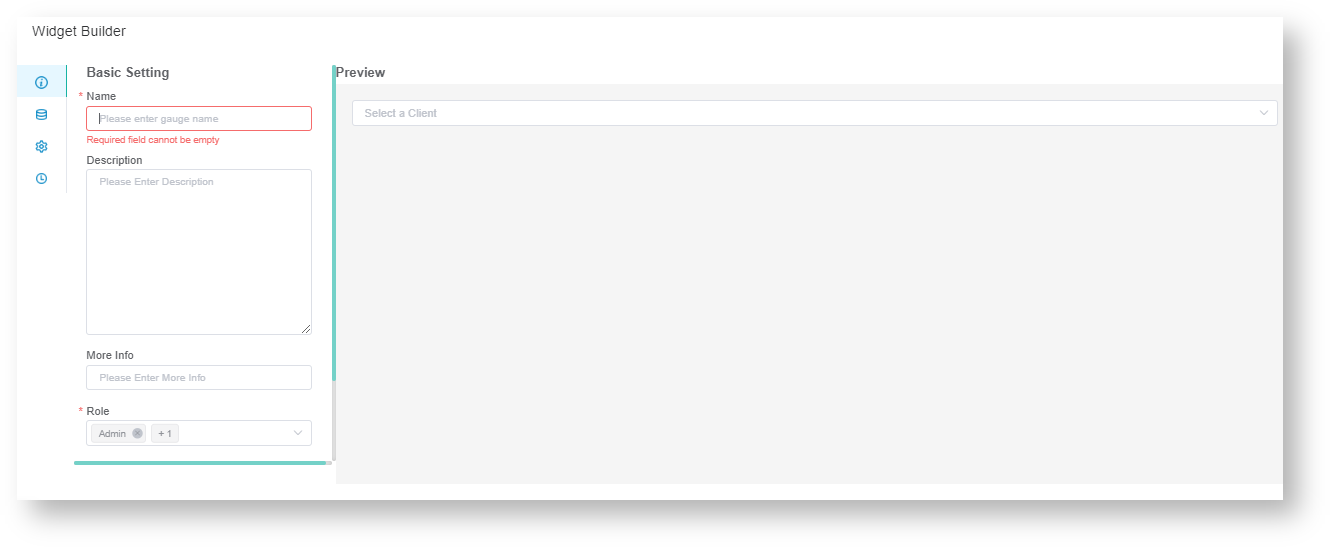
- Click the Apply button.
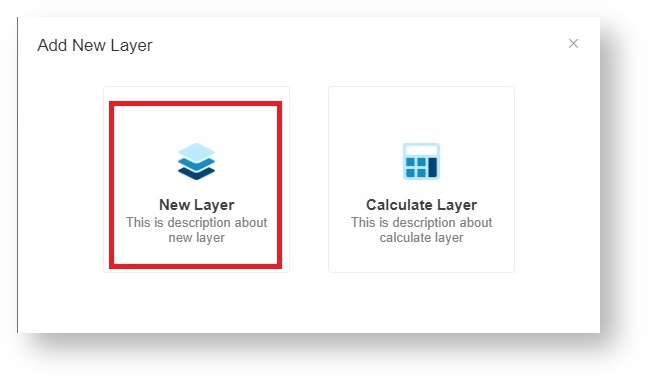
- Next, go to Data Source and click the + button to add a slicer.

- Select New Layer on the window that appears. This step opens the Dataset window.
- Do the following on the Dataset window:
- Select a Dataset to use. The dataset should be in line with the dataset of the widget/s that will be linked to the slicer.
- Add columns by selecting an option from the Column Name dropdown list and assigning an Alias and Business Type for each. Click the + icon to add more rows.
- Add values for the Filter, Measure, and/or Dimension, as well as for Order By, as needed.

Important: Make sure to tick the checkbox for Remove Duplicate Data. Users most commonly need to add values for Filter and Order By only.
- Click the Save button then Apply.
- Next, go to Config and provide data for the following fields:
- Text - Input the Alias for the slicer name.
- Value - Input the same Alias entered for the slicer value.
- QueryParams - Input the alias for the column used as a lookup. If the lookup column has the same value as the slicer value, then you can use the alias for the slicer value.
For example: If the slicer value is board name, then the slicer lookup is board id - Watermarks - Input the text to show on the slicer field before a value is chosen. Example: Select a Board.
- Filter Label - Input the slicer's label. Example: Board or Board Name.
- Select - Select ALL or Only First. Selecting ALL sets the default slicer value to all the available values thus, the widget/s linked to this will show all the data for the value. On the other hand, selecting Only First sets the default slicer value to the first available value for the slicer.
- Multiple Mode - A checkmark on this checkbox allows the user to select multiple values in the slicer.

- Click Apply. This will show a preview of the slicer that you have created.
Overview
Content Tools
N O T I C E
MSPbots WIKI is moving to a new home at support.mspbots.ai![]() to give you the best experience in browsing our Knowledge Base resources and addressing your concerns. Click here
to give you the best experience in browsing our Knowledge Base resources and addressing your concerns. Click here![]() for more info!
for more info!