 N O T I C E
MSPbots WIKI is moving to a new home at support.mspbots.ai![]() to give you the best experience in browsing our Knowledge Base resources and addressing your concerns. Click here
to give you the best experience in browsing our Knowledge Base resources and addressing your concerns. Click here![]() for more info!
for more info!
Page History
...
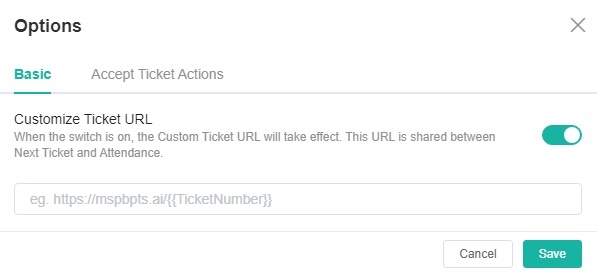
Customize Ticket URL
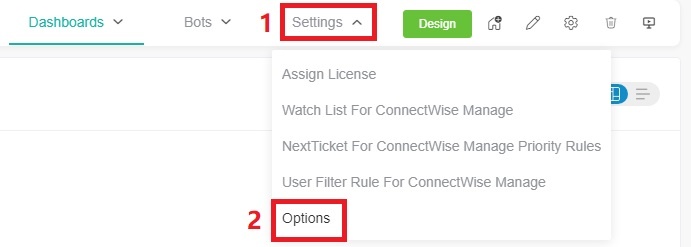
- Go toNext Ticket for ConnectWise Manageapp.
- Click Settings> Options.
- When the Options tab appears, toggle the Customize Ticket URL switch and enter your custom ticket URL, replacing the actual ticket number with the {{TicketNumber}} token.
- For example, if the original ticket URL is https://manage.mspbotssample.com/v4_6_release/ConnectWise.aspx?locale=en_US&routeTo=ServiceFV&recid=5027470, and you want to customize the ticket URL to https://mtx.link/5027470, you need to enter https://mtx.link/{{TicketNumber}} in the "Customize Ticket URL" option. So, when you click on the ticket number, the link will point to https://mtx.link/5027470.
Tip The "Customize Ticket URL" feature is universal in the Attendance Manage and all NextTicket apps:
- If you toggle on the "Customize Ticket URL" switch in any one of the attendance management or all the NextTicket apps, the switch for this feature in the remaining apps will also be turned on. If you turn off the switch in any of these apps, the switch for this feature in the remaining apps will also be turned off.
- When you configured the "Customize Ticket URL" in any of these apps, it will be applied to all the remaining apps.
- If the "Customize Ticket URL" switch is turned off, the ticket links will remain as the originally generated links.
- For example, if the original ticket URL is https://manage.mspbotssample.com/v4_6_release/ConnectWise.aspx?locale=en_US&routeTo=ServiceFV&recid=5027470, and you want to customize the ticket URL to https://mtx.link/5027470, you need to enter https://mtx.link/{{TicketNumber}} in the "Customize Ticket URL" option. So, when you click on the ticket number, the link will point to https://mtx.link/5027470.
- Click Save to keep your settings.
Anchor Configure Accept ticket actions Configure Accept ticket actions
Configure Accept ticket actions
| Configure Accept ticket actions | |
| Configure Accept ticket actions |
- Go to Next Ticket for ConnectWise Manageapp.
- Click Settings> Options.
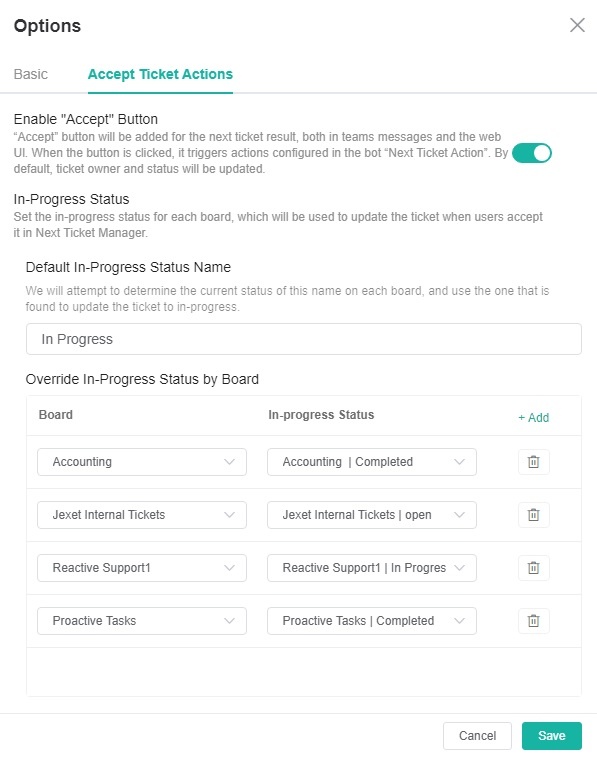
- When the Options tab appears, click Accept Ticket Actions.
- Enable "Accept" Button - By turning on this switch, you will be able to accept your ConnectWise tickets in the NextTicket for ConnectWise app. The switch is closed by default. Please note that the "Accept" feature will only work properly when you have set the field in the "In-Progress Status" section.
- In-Progress Status - Fill in the following fields to set which ticket statuses will be displayed as "In Progress" in the personal card of the Attendance app.
- Default In-Progress Status Name - The name represents the status name displayed for ConnectWise tickets that are in progress on the individual card in the Attendance app. The default status name is "In-Progress".
Override In-Progress Status by Board - You can set which ticket statuses will be considered as in progress when you click "Accept" for each board.Anchor Override In-Progress Status by Board Override In-Progress Status by Board - For example, if you set the status for tickets under the "Accounting" board as "Completed," clicking "Accept" will change those tickets to the Completed status. The ticket with the Completed status will be displayed on the Ticket Owner's individual card in the Attendance app as "Default In-Progress Status Name - In-Progress."
- For example, if you set the status for tickets under the "Accounting" board as "Completed," clicking "Accept" will change those tickets to the Completed status. The ticket with the Completed status will be displayed on the Ticket Owner's individual card in the Attendance app as "Default In-Progress Status Name - In-Progress."
- Click Save to keep your settings.
...
Overview
Content Tools