 N O T I C E
MSPbots WIKI is moving to a new home at support.mspbots.ai![]() to give you the best experience in browsing our Knowledge Base resources and addressing your concerns. Click here
to give you the best experience in browsing our Knowledge Base resources and addressing your concerns. Click here![]() for more info!
for more info!
Page History
...
b. Hover over the upper right corner of the widget. Click the ellipsis button then select Create Bot.


Create a new bot
...
a. When the Create a new bot window opens, provide a Bot Name and identify the Role that will be allowed to access the bot. Adding a clear Description of the bot is recommended.

d. Click the Confirm button. Automatically the Trigger form will show next.
Note: Trigger form is under the Design Tab.
...
Set up the bot trigger.
a. Setup the Trigger script. The widget name is automatically provided. The name in this field is inherited from the name of the report or widget where you started the bot creation.

b. Add criteria/s at "meet following criteria: " section. Select +Add Group or + Add Condition if applicable.


c. Click the ![]() Data Inspector icon if you want to preview the data available.
Data Inspector icon if you want to preview the data available.
...
d. Set the time and frequency for running the bot under "I want the bot to run base on this Schedule:" section.

e. For advance scheduling, hover to the Advance Scheduler section and click the "Setting" link.

g. Manually setup the Bot to alert in Minutes, Hours, Day, Month and Year. Then, click Save.
...
h. Click the Next button to continue.
Define the bot alert
...
script.
a. Select the channel(s) where the Bot will send the alert message. You may select multiple channels, depending on your requirement.
- Microsoft Teams Chat
- Microsoft Team Channel
- Web Message

b. Set up the Alert message. E.g. Select "Email" alert.
...
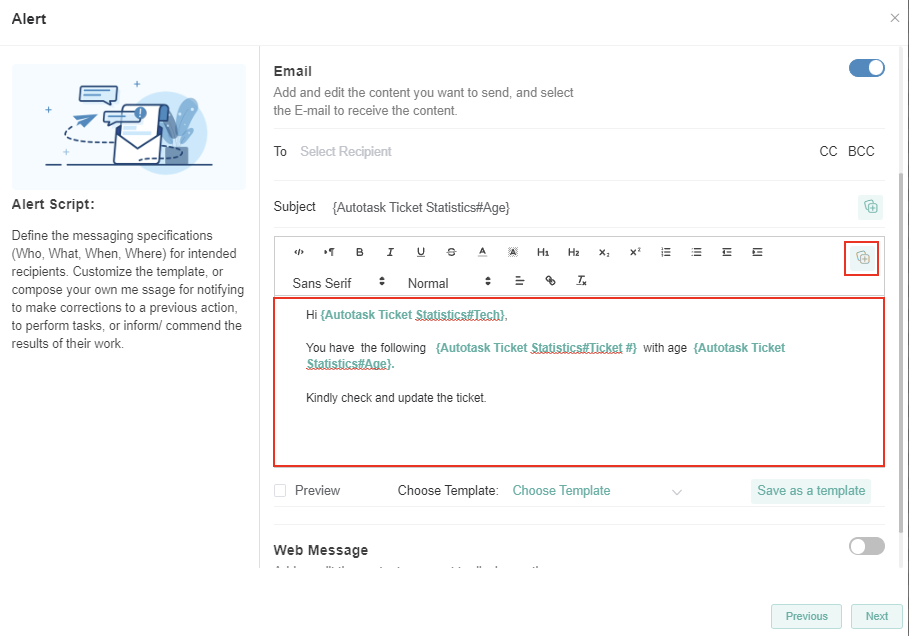
c. You may use the Insert a Token icon to select the data to include in the message. You can also use the formatting icons to highlight sections in the message.
...
d. Click Next when done.
Set the Escalation script
...
Take note that the escalation recipient can be another user, a manager, and/or a next-level manager, depending on your requirement. You can also set several escalation steps as needed.
...
d. Click the Finish button when done.
Activate the Bot
In order for the bot to start sending alerts, click the Detail tab and switch ON the ff:
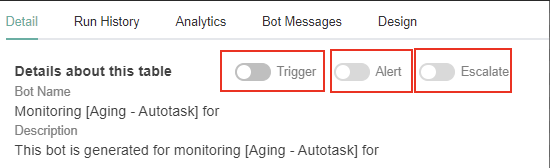
a. Switch ON Trigger. - Trigger ON makes the bot available and running.
b. Switch ON Alert. - Alert ON enables the sending of alerts.
c. Switch ON Escalate. - Escalation ON activates the escalation setup.
| Content by Label | ||||||||||
|---|---|---|---|---|---|---|---|---|---|---|
|
...
Overview
Content Tools