 N O T I C E
MSPbots WIKI is moving to a new home at support.mspbots.ai![]() to give you the best experience in browsing our Knowledge Base resources and addressing your concerns. Click here
to give you the best experience in browsing our Knowledge Base resources and addressing your concerns. Click here![]() for more info!
for more info!
Page History
The Options setting of the Attendance Manager enables users to customize the Attendance dashboard to suit different user preferences. This article explains each option and how you can to modify them for your needs.
What's in on this articlepage:
| Table of Contents | ||||
|---|---|---|---|---|
|
Background
...
information
...
Companies have unique preferences and needs to ensure efficient and seamless operations and maximize productivity. If you want to show To meet these business requirements, go to the Options settings in the Attendance Manager app and tweak the dashboard settings to:
- Show details like the ticket number and time spent on a ticket,
...
- Allow receiving and
...
- sending commands using a mobile device,
...
- and
- Change the appearance of the Attendance dashboard
...
- .
Prerequisites for customizing settings
...
- Attendance Manager app installed in MSPbots
- Admin permissions to configure the Attendance Manager settings
What settings can I customize in the Attendance Manager
...
?
...
These are the settings for customization and the instructions on how to modify them.
How to modify the settings:
- Open the Options settings.
- In the MSPbots app. , go to Apps and open Attendance on the Apps list.
- Click on Settings, then select Optionsto open the Options window.


- In the MSPbots app. , go to Apps and open Attendance on the Apps list.
Modify this setting to customize the color of
- the attendance
- statuses displayed in the Attendance dashboard.
- Attendance Status Color
- .
- Click the color button located on the right side of corresponding to the attendance status you want to modify.
- Select a color and click OK.
- Perform the same operation Repeat for the color button of other attendance statuses . Once saved, the Attendance dashboard will reflect your changes.as needed.

Show Ticket Number & Time
:Show
When Click the switch is turned on:If the technician is working on a ticket, the attendance status card will display the ticket number being processed by the technician and the amount of time already spent on it.
If the technician is not working on any tickets, it will display the idle time. Show Ticket & Time switch to view the technician's current ticket number and the total time spent working on it.

When the switch is turned off, ON, the Attendance status card displays the ticket number assigned to the technician and the time he has spent processing on the ticket, or . The card shows the idle time if the technician is not working, and nothing will not be displayed if the switch is OFF.Text Color
- When the "
Modifying this setting changes the text color for the ticket number and time. When the Show Ticket Number & Time" switch is turned onenabled, you must adjust the text color for displaying the ticket number and time needs to be customized to match to ensure that it matches the background color.


Company Name
- When the switch is turned on, the company name will be displayed
Enable this option to display the company name in the status card details.


mobile APPs:This toggle switch is primarily used to manage and control whether MSPbots receive and respond to
This option enables MSPbots to recognize and respond to Attendance commands from iOS and Android platforms . It allows you to flexibly decide whether to allow attendance commands from mobile applications based on your company's requirements and security policies. This switch does not affect commands from "Web, Mac, and Windows" platforms.By default, the switch is turned on, allowing all The switch is ON by default and recognizes commands from all platforms including "iOS, Android, Web, Mac, and Windows".When

Commands from iOS and Android are rejected when the switch is turned off, commands from iOS and Android platforms will be rejected. If you send a command from either of these platforms, you OFF. You will receive the following response:
"Attendance commands from mobile are not allowed, please send your command from desktop." However, commands
Commands from the Web, Mac, and Windows platforms will still be accepted.are recognized even when the option is disabled. The available commands include: infor mobile apps are:
in (in at), break, lunch, onsite, back, wfh WFH, out (out at), stats, and PTO.
- .
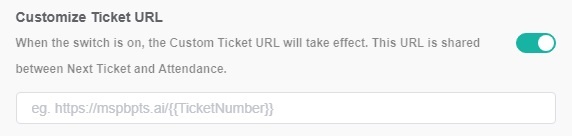
Customize Ticket URL
This option allows you to customize the ticket URL. When the "Customize Ticket URL" switch is turned on, your customized ticket URL will take effect. This link is shared across all Next Ticket apps and Attendance Manager apps.
You can customize the ticket URL using the following format, replacing the actual ticket number with the {{TicketNumber}} token:For example, if the original ticket URL is https://manage.mspbotssample.com/v4_6_release/ConnectWise.aspx?locale=en_US&routeTo=ServiceFV&recid=5027470, and you want to customize the ticket URL to https://mtx.link/5027470, you need to enter https://mtx.link/{{TicketNumber}} in the "Customize Ticket URL" option. So, when you click on the ticket number, the link will point to https://mtx.link/5027470.
Tip The "Customize Ticket URL" feature is universal in the Attendance Manage and all NextTicket apps:
- If you toggle on the "Customize Ticket URL" switch in any one of the attendance management or all the NextTicket apps, the switch for this feature in the remaining apps will also be turned on. If you turn off the switch in any of these apps, the switch for this feature in the remaining apps will also be turned off.
- When you configured the "Customize Ticket URL" in any of these apps, it will be applied to all the remaining apps.
- If the "Customize Ticket URL" switch is turned off, the ticket links will remain as the originally generated links.
...
...

...
| Content by Label | ||||||||||
|---|---|---|---|---|---|---|---|---|---|---|
|
...
Overview
Content Tools