 N O T I C E
MSPbots WIKI is moving to a new home at support.mspbots.ai![]() to give you the best experience in browsing our Knowledge Base resources and addressing your concerns. Click here
to give you the best experience in browsing our Knowledge Base resources and addressing your concerns. Click here![]() for more info!
for more info!
Page History
What's on this page:
| Table of Contents |
|---|
Introduction
...
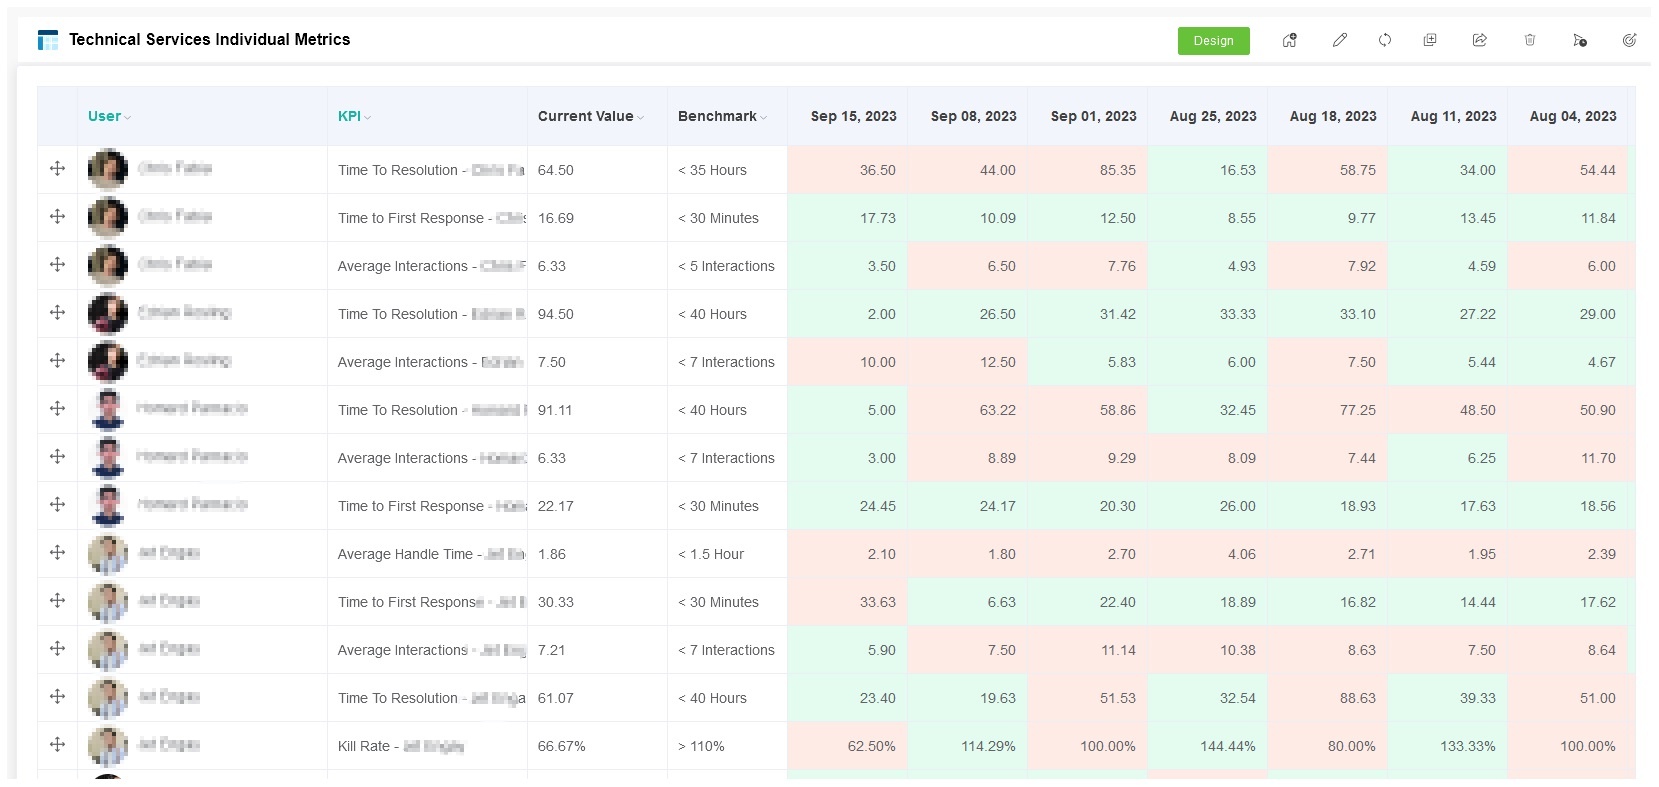
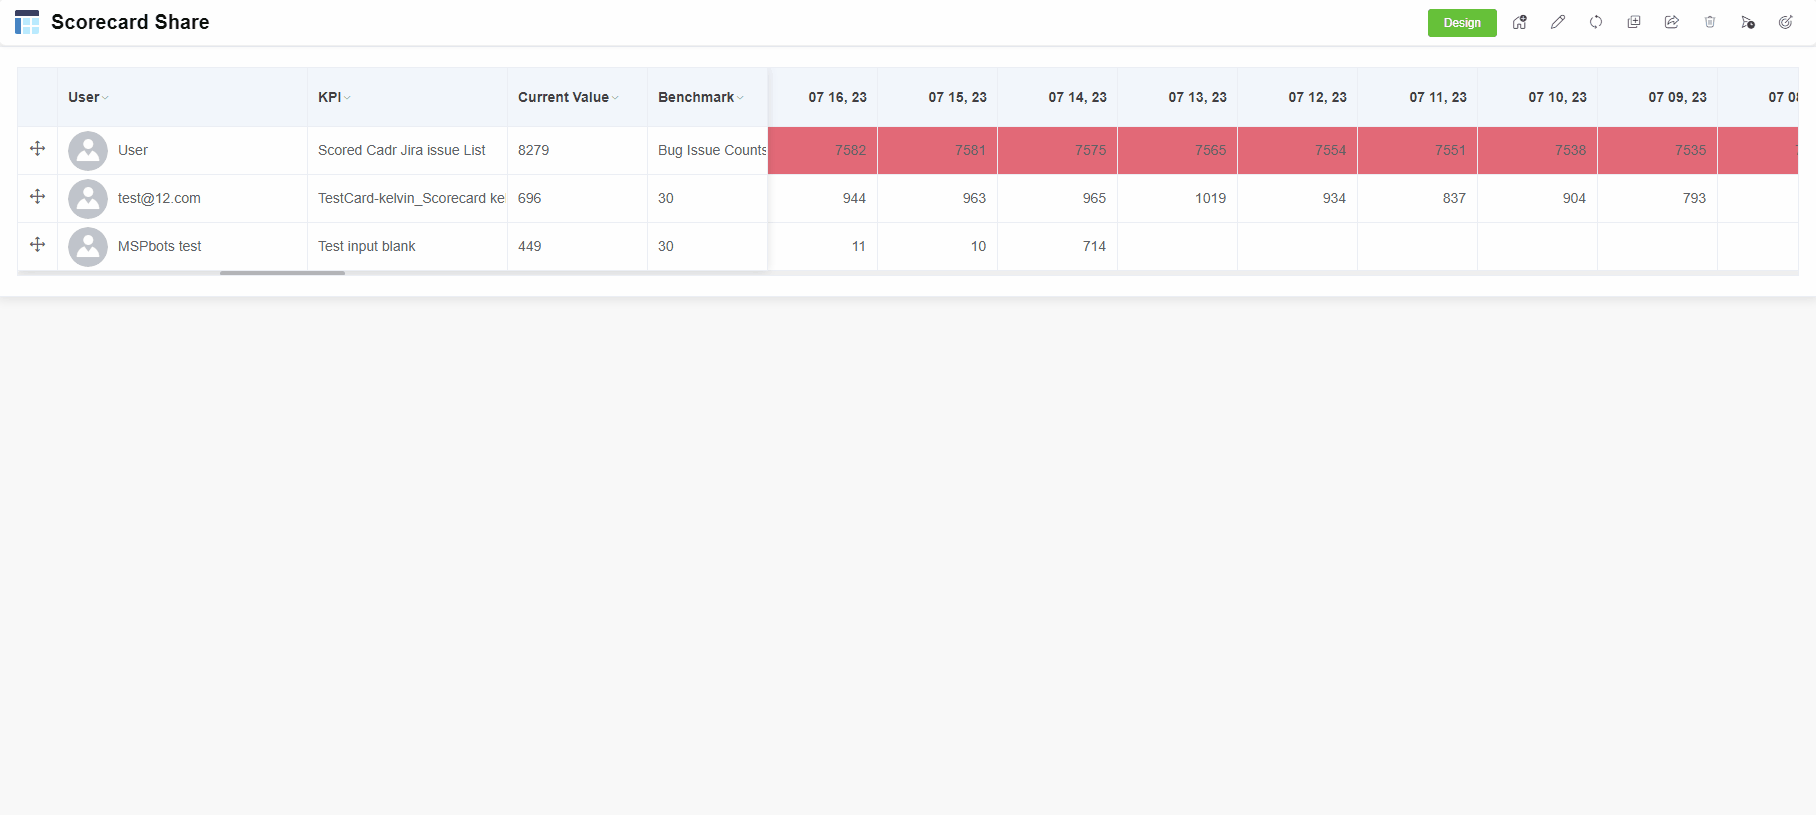
Scorecard Dashboards contain Target Card widgets to make it easier for users to view actionable data on one page. Similar to standard dashboards, Users can view and add filters to Scorecard Dashboards in MSPbots. This article shows how to create Scorecard Dashboards scorecard dashboards in the MSPbots app.
Steps to create a Scorecard Dashboard:
Background Information
...
Scorecard Dashboards are like other MSPbots dashboards, which allow users to identify actionable data from a single page. Unlike other dashboards, a scorecard dashboard hosts only target card widgets and is useful for monitoring historical values against specific sets of targets.
Required Permissions
...
Only users with admin permissions can create or edit a Scorecard Dashboard.
Prerequisites
...
Before you proceed, please make sure that you are logged in to MSPbots as an administrator.
How to Create a Scorecard Dashboard
...
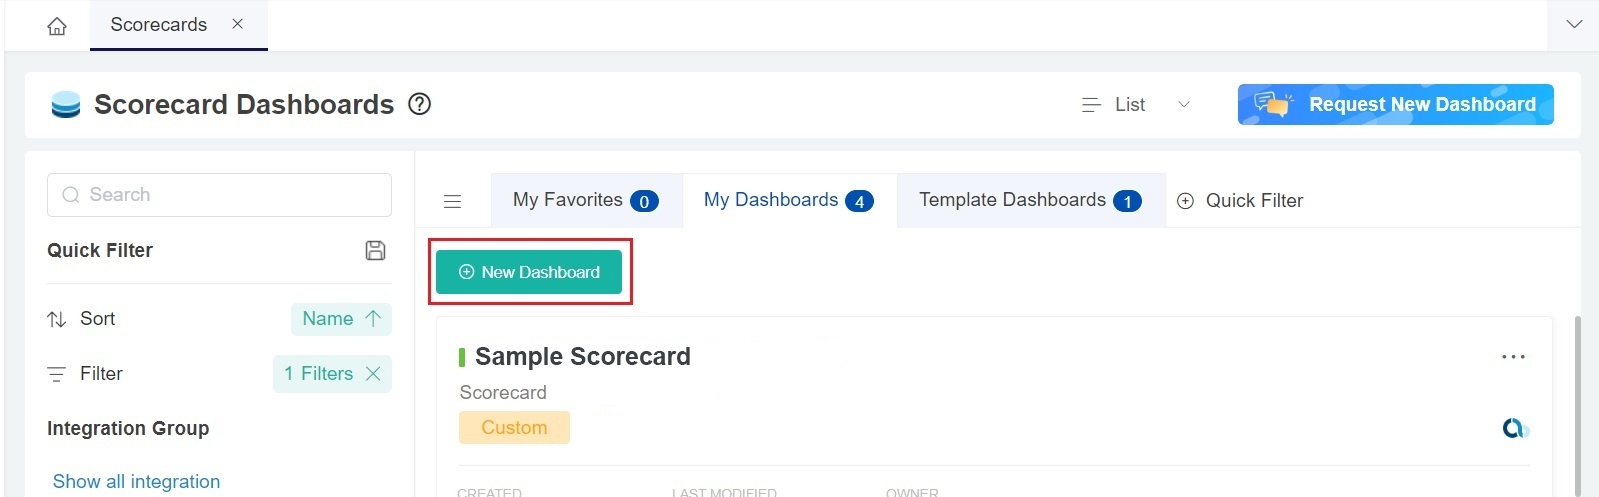
- Navigate to Scorecards on the MSPbots menu.

- Open the MSPbots app as administrator.
- Click Scorecards on the menu.

- On the Scorecards tab, click the New Dashboard button to open the Add New Scorecard Dashboard window.
- Give On the Add New Scorecard Dashboard window:
- Give the scorecard dashboard a Name a name.
- Select the roles Role that will have access to the report. You can select multiple roles.
- Provide a description of Description for the dashboard being created.


- Click Continue. The tab for the new dashboard opens. to start designing your dashboard.
- When the dashboard you created appears, click Click the Add Widgets button. Please note the Scorecard Dashboard will only accept Target Card widgets.
 Select the This opens the Add Widgets window.
- On the Add Widget window, click Widgets List,and select the target card widgets that you want to appear
- include in the Scorecard Dashboard , then click the Add button.
- The selected widgets will appear on the dashboard you have just created.
- Click Setting.

- The Scorecard Layout Setting window will then appear. Select the Default View you want your widgets to appear on the dashboard.
- Click Save on the Scorecard Layout Setting window. Click Save Dashboard to save the Scorecard Dashboard once done.
- . Finally click the Add Selected button.

The widgets that you have selected will now appear in the scorecarddashboard.Note title Important Only target card widgets are shown in the scorecard dashboard.
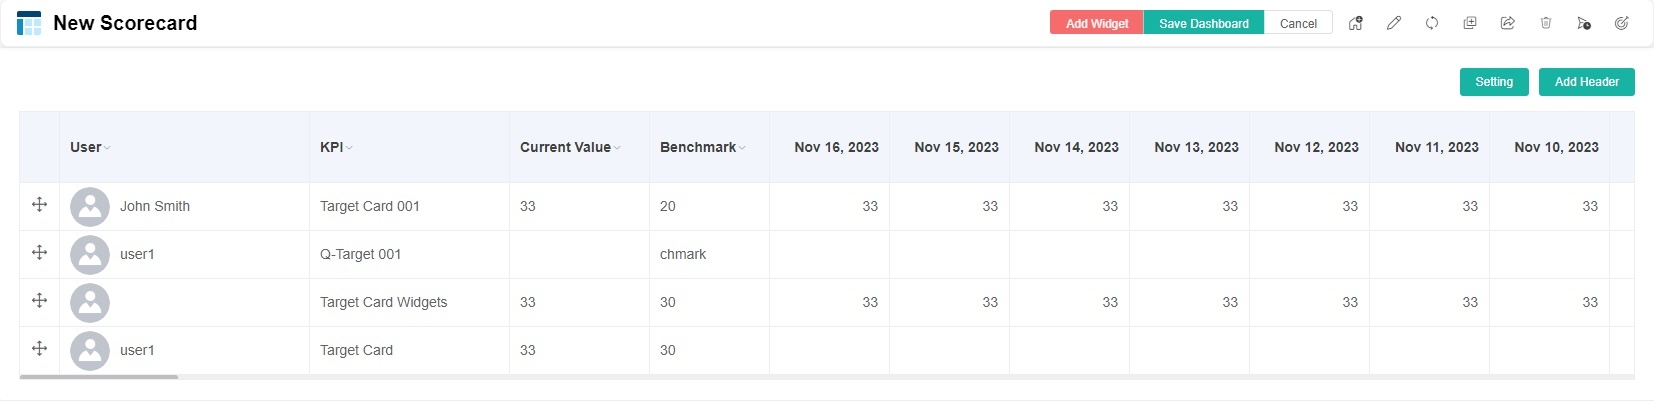
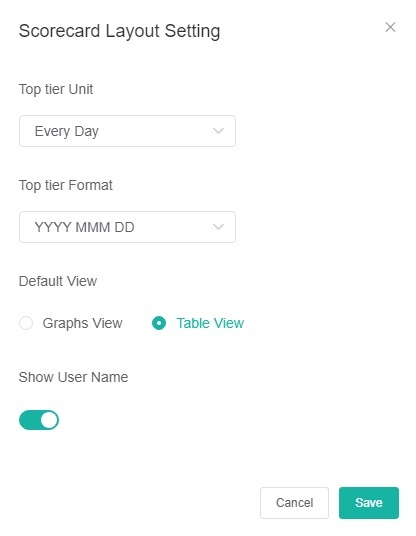
- Click the Setting button to open Scorecard Layout Setting pop-up window.

On the Scorecard Layout Setting window, configure the following fields, then click Save.
- Top tier Unit - Configure how the data is displayed at intervals. Currently, only the following three options are supported:
- Every Day - Display data for each day
- 1st of Every Month - Display data for each month
- Every Sunday - Display data for each Sunday
- Top tier Format - The format of the top tier date. Supported formats include YYYY MMM DD, MMM DD, YYYY, and MM DD, YY.
- Default View - Choose how the widgets are presented on the dashboard. Select Graphs View or Table View.
- Show User Name - Enable this switch to display the user name for each widget on the scorecard dashboard.
- Top tier Unit - Configure how the data is displayed at intervals. Currently, only the following three options are supported:
Click the Add Header button to add a header to the scorecard dashboard.

- On the Add Header window, enter the desired header name and click Save. If you want to modify the added header, simply click on the header to edit it. You can add multiple headers. To delete the header, follow the same process.
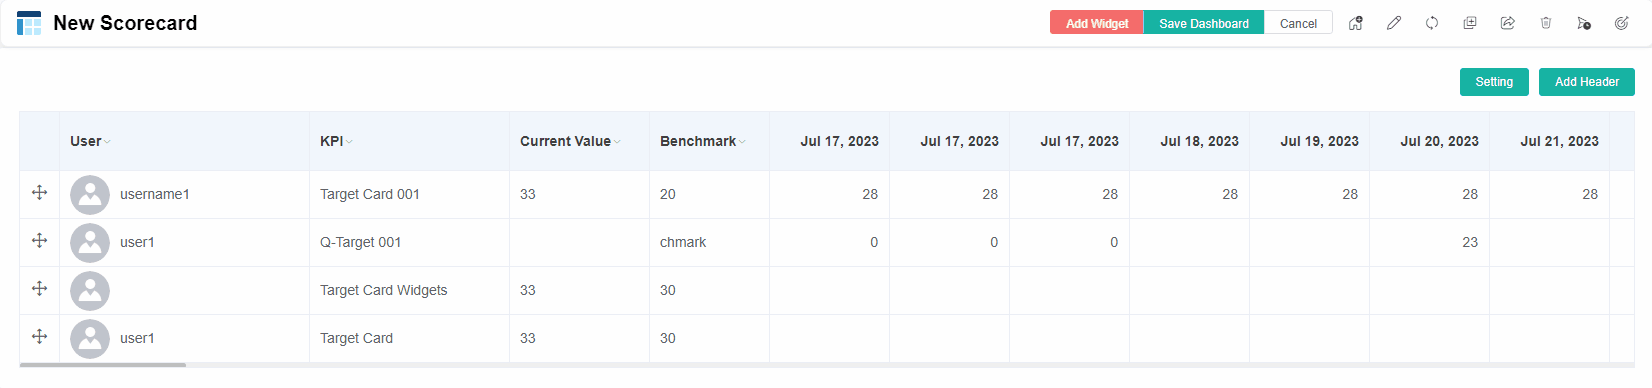
- Click Save Dashboard on your Scorecard Dashboard to save your settings.

- When the page displays Dashboard layout save success it indicates that the creation was successful.
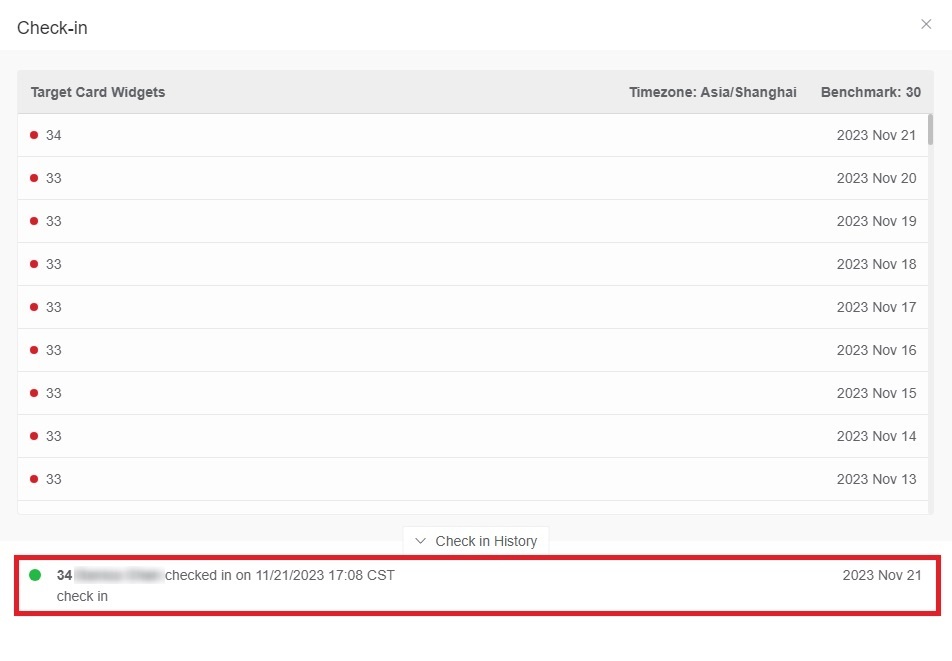
Info title Check-in - Now you can not only modify the existing values of widgets in the scorecard dashboard, but also add values to blank fields in your scorecard dashboard. However, if all the values of a widget in the scorecard dashboard are blank, you cannot add values to the empty fields. When you modify field values or add values to blank fields, you can also add comments to key performance indicator fields in the scorecard. Here are the step-by-step instructions:
- In scorecard dashboard window, click the empty field or the field value you want to modify.
- In Check in pop-up window, click again the empty field or the field value you want to modify, and enter the new value in New Value, then add a comment in Comments.
- Click Check In.
- With regards to Check in History, it keeps a record of the modifications you made to field values and the comments you added to certain fields. You can click Check in History to view these modification histories. If you added comments to the fields of key performance indicators in the scorecard dashboard, you can quickly identify which fields are the key indicators through the comments.
- Now you can not only modify the existing values of widgets in the scorecard dashboard, but also add values to blank fields in your scorecard dashboard. However, if all the values of a widget in the scorecard dashboard are blank, you cannot add values to the empty fields. When you modify field values or add values to blank fields, you can also add comments to key performance indicator fields in the scorecard. Here are the step-by-step instructions:

Related Topics
...
| Content by Label | ||||||||
|---|---|---|---|---|---|---|---|---|
|
Overview
Content Tools