 N O T I C E
MSPbots WIKI is moving to a new home at support.mspbots.ai![]() to give you the best experience in browsing our Knowledge Base resources and addressing your concerns. Click here
to give you the best experience in browsing our Knowledge Base resources and addressing your concerns. Click here![]() for more info!
for more info!
N O T I C E
MSPbots WIKI is moving to a new home at support.mspbots.ai![]() to give you the best experience in browsing our Knowledge Base resources and addressing your concerns. Click here
to give you the best experience in browsing our Knowledge Base resources and addressing your concerns. Click here![]() for more info!
for more info!
The Technology Marketing Toolkit app helps you gauge and monitor your company's performance with insightful widgets and Key Performance Indicator (KPI) functions that allow you to devise data-driven initiatives to boost your company's financial health, revenue, and growth. This app is available for ConnectWise PSA, Autotask, and Kaseya BMS users. Initially designed for Robin Robins, this app is now available to everyone who wants to secure success for their MSP and company.
What's in this article:
How to install Technology Marketing Toolkit
To install the app:
- Go to Marketplace on the MSPbots app then click the Apps tab.
- Scroll down and find Technology Marketing Toolkit. Click the app.
- Click Install.
How to access the app
Once installed, you can access the Technology Marketing Toolkit app by going to Apps on the MSPbots app menu and clicking Technology Marketing Toolkit App on the Apps tab.
What are the Technology Marketing Toolkit dashboards?
The Technology Marketing Toolkit app has two dashboards that accessed by clicking Dashboards on the Welcome Page and selecting the dashboard you want to view. 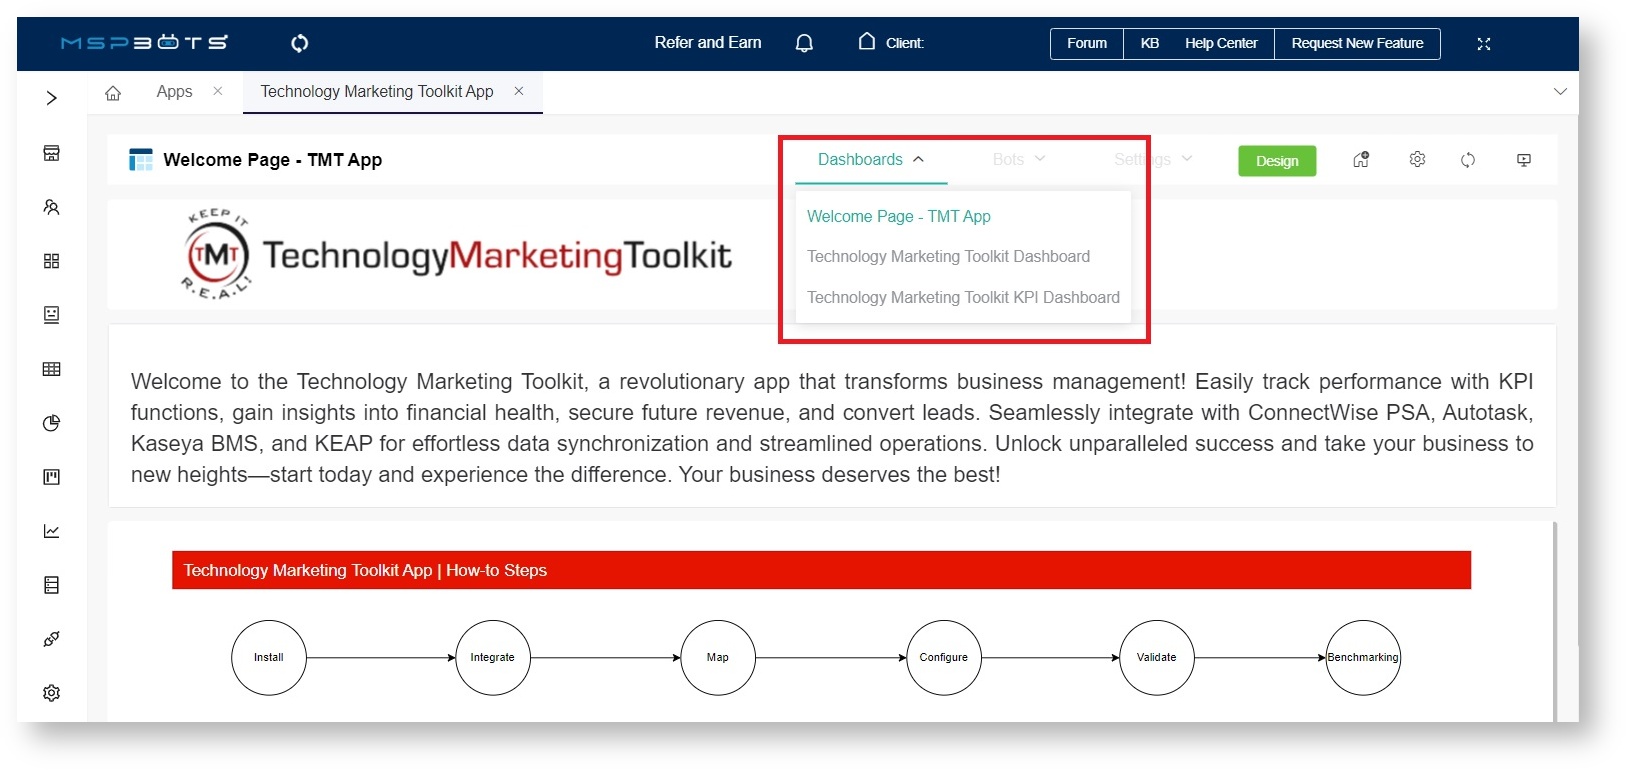
- Technology Marketing Toolkit Dashboard - This dashboard shows Company Financial KPIs like Net Profit and Gross Revenue and Sales and Marketing KPIs like Raw Leads and Qualified Leads. You can filter the data using the Data Range slicer.

The Technology Marketing Toolkit Dashboard contains the following widgets:- MRR Clients - A card number displaying the count of clients with recurring service contracts
- Active Clients - A card number displaying the count of clients with active contracts
- Net Profit - A card number displaying the net profit from the Technology Marketing Toolkit financial mapping
- Gross Revenue - A card number displaying the gross revenue from the Technology Marketing Toolkit financial mapping
- MRR Under Contract - A card number displaying the total recurring revenues from the Technology Marketing Toolkit financial mapping
- Raw Leads - A card number displaying the count of contacts tagged as a raw lead
- Qualified Leads - A card number displaying the count of contacts tagged as a raw lead
- First-Time Appointments - A card number displaying the count of first-time appointments
- New Customer Closed - A card number displaying the count of contacts tagged as a new customer closed
- New Customer MRR Added - A card number displaying the total recurring revenue (MRR field in Keap Opportunities) based on the estimated close date of closed or won opportunities
- Total Contract Value - A card number displaying the total contract value (Final Opportunity Amount field in Keap Opportunities) based on the estimated close date of closed or won opportunities
- Technology Marketing Toolkit KPI Dashboard - Unlike the previous dashboard that shows the overall number for each KPI, this dashboard shows the drill-through of your data at a glance. You can filter the data using the Time Frame slicer.

How can I start using Technology Marketing Toolkit?
Once you have successfully installed Technology Marketing Toolkit, connected your PSAs and software to MSPbots, and configured some settings, you are ready to use the app.
1. Connect your software.
The Technology Marketing app work on the software in the table below. Click your PSAs and software to view the guide on how to connect these to MSPbots.
| PSA | Marketing | Financial |
|---|---|---|
| ConnectWise PSA | Keap | Quickbooks Online |
| Autotask | Quickbooks On-Premise | |
| Kaseya BMS | Xero |
2. Map your account to Technology Marketing Toolkit
The KPI values and data in your dashboards are generated from your datasets and become available after your account is successfully mapped.
To map your account,
- On the MSPbots app, go to Settings > Account Mapping.

- Go to Map to and select Technology Marketing Toolkit Built-in Template from the dropdown list.
- Select the accounts to map on the left box and drag them to the right.
- Click Save when done.
For a complete guide on how to map your accounts, read the article How to Access and Use the Accounting Mapping Feature. Ensure that you select Technology Marketing Toolkit Built-in Template from the dropdown list.
3. Configuring your KPI widgets
You need to set up your widgets to show the specific data and values that you want to monitor and use for measuring your company's performance. By configuring your widgets, you can filter out unnecessary data and focus on only the important ones.
To configure your widgets:
- On the Technology Marketing Toolkit app, go to Settings and select Technology Marketing Toolkit KPI Settings.

- Once in the Technology Marketing Toolkit Settings window, go to Clients and Contracts and select the entries to be included in the results from the following dropdown fields:
- Company Type / Classification
- Agreement Type / Contract Category

You can include multiple entries and also delete selected entries.
- Next, go to Sales and Marketing and select the tags that will be applied to the following:
- Raw Leads
- Qualified Leads
- First Time Appointments
- New Customer Closed

- When done, click Submit then Close.
- Review and validate the edited widget.
4. Validating your dashboards and widgets
You are now ready to view your dashboards. Go to Dashboards and check if the Technology Marketing Toolkit Dashboard and the Technology Marketing Toolkit KPI Dashboard show correct data
5. Start benchmarking
Now that your KPIs are in place in the app, you can start benchmarking to evaluate your company's performance and identify best practices that will help improve your service and operations. Begin by selecting KPI benchmarks and creating or joining peer groups. The following guides have the information that will jump-start your peer group benchmarking.
6. Add or use KPI templates for your peer group
These steps will add a KPI widget using your chosen KPI template for your peer group.
Only peer group captains can add and use KPI templates for KPI widgets.
- In the MSPbots app, go to PeerGroup.
- Select your peer group from the list on the Peer Group window.
- Click the +Add button.

- In the Add Widget window, search for TMT Peer Group KPI. Refer to the image below for Steps 4 to 6.

- Next, select the KPIs for adding.
- Click Add Selected when done with your selections.
For related information on adding KPIs, go to the article How to Add a KPI for Your Peer Group.
Overview
Content Tools
N O T I C E
MSPbots WIKI is moving to a new home at support.mspbots.ai![]() to give you the best experience in browsing our Knowledge Base resources and addressing your concerns. Click here
to give you the best experience in browsing our Knowledge Base resources and addressing your concerns. Click here![]() for more info!
for more info!