 N O T I C E
MSPbots WIKI is moving to a new home at support.mspbots.ai![]() to give you the best experience in browsing our Knowledge Base resources and addressing your concerns. Click here
to give you the best experience in browsing our Knowledge Base resources and addressing your concerns. Click here![]() for more info!
for more info!
N O T I C E
MSPbots WIKI is moving to a new home at support.mspbots.ai![]() to give you the best experience in browsing our Knowledge Base resources and addressing your concerns. Click here
to give you the best experience in browsing our Knowledge Base resources and addressing your concerns. Click here![]() for more info!
for more info!
Attendance Manager users can submit and manage paid time off (PTO) requests in the app. This guide provides employees and administrators instructions for effectively handling PTO requests and overseeing the entire process.
What's in this article:
Why should I use the Attendance Manager for PTO-related tasks?
PTO requests and approvals can be a tedious and complex process for some companies and large organizations. With the Attendance Manager, you have a tool where performing PTO-related activities is simple and can be done seamlessly in one place. By following the instructions outlined in this article, employees will be able to conveniently create, edit, and delete their PTO requests, saving time and reducing the complexity typically associated with the process. On the other hand, administrators can efficiently assign approvers for user-submitted PTO requests and easily approve or reject requests assigned to them. Furthermore, this article highlights the administrative ability to create, edit, and delete PTO requests on behalf of users.
Prerequisites for using the PTO Requests feature
- The user should be added to the Attendance Team Member list to be able to use the Attendance Manager and file PTO requests.
- PTO approval and assigning approvers are done by users with the admin role and permissions only.
How to request Paid Time Off
This procedure is for creating PTO requests. It also applies to administrators who want to file a PTO request on behalf of other users.
- Go to Apps and open the Attendance app.
- On the Attendance page, click on Settings, then select PTO Requests.

- Click the +New button to open the Request Time Off pop-up window.

- On the Request Time Off window, select the Date Range and fill in the Reason field.

- Click Add. The message "Submitted successfully" appears to show that the submission is successful.

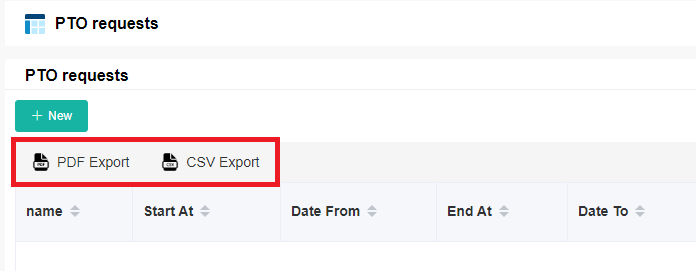
Download a PDF or CSV copy of the PTO requests list by clicking the PDF Export or CSV Export buttons.
How to cancel a PTO request
This procedure is for canceling PTO requests. It also applies to administrators who want to cancel a PTO request on behalf of other users.
- Go to Apps and open the Attendance App.
- On the Attendance page, click on Settings, then select PTO Requests.
- On the PTO Requests list, click on Cancel under the Operations column.

- On the Request PTO pop-up window, turn the Cancel? switch ON.

- Click Confirm.
How to assign an approver
This procedure is for assigning approver(s) of PTO requests. Only administrators can set the approvers in the Attendance Manager.
- Go to Apps and open the Attendance app.
- When the Attendance page opens, click Settings, then select Options > Approval Flow.
- Fill in the following fields:
- All/One - Select from the following:
- One Must Approve - The approval process is completed when one person agrees or rejects.
- All Must Approve - The approval process is completed when all individuals approve, or if one person rejects.
- Approvers - Select one or multiple approvers. You can directly choose {Your Manager} or select one or multiple approvers.
- Exceptions - Use this field to select a user for approval in exceptional circumstances.

- All/One - Select from the following:
- Click Save.
How to approve time off requests
This procedure guides administrators in reviewing PTO requests for approval.
- Go to Apps and open the Attendance app.
- On the Attendance page, click on Settings, then select PTO Requests.
- On the PTO Requests list, click Approve under the Operations column.

- Click Reject to reject a request.
Remember to take caution when selecting Approve or Reject because the action takes immediate effect upon clicking.

- When the page displays Submitted successfully, it means the approval or rejection was successful.
Related Topics
Overview
Content Tools
N O T I C E
MSPbots WIKI is moving to a new home at support.mspbots.ai![]() to give you the best experience in browsing our Knowledge Base resources and addressing your concerns. Click here
to give you the best experience in browsing our Knowledge Base resources and addressing your concerns. Click here![]() for more info!
for more info!