 N O T I C E
MSPbots WIKI is moving to a new home at support.mspbots.ai![]() to give you the best experience in browsing our Knowledge Base resources and addressing your concerns. Click here
to give you the best experience in browsing our Knowledge Base resources and addressing your concerns. Click here![]() for more info!
for more info!
Page History
Priority Rules determine the priority tickets for technicians out of all the tickets pooled by the NextTicket Filters. To create apply these rules, you can use your admin access to assign prioritize tickets by assigning positive points to high-priority scenarios to prioritize tickets and fewer and deprioritize tickets by assigning less or negative points to low-priority ones to deprioritize tickets. cases.
What's in this article?
| Table of Contents |
|---|
What is the format of a Priority Rule?
...
The format of priority rules is:
If if <condition/scenario>, then add or deduct points.
In the example below, the tickets assigned to the current user will be prioritized over unassigned tickets and those assigned to other technicians. 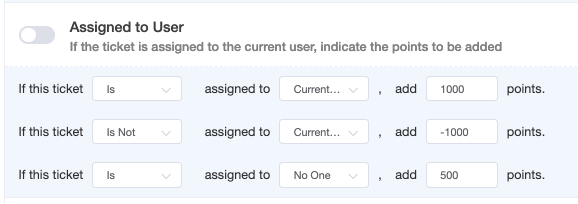

Activating a Priority Rule
...
You can activate a priority rule by enabling the corresponding toggle switch for the corresponding rule. Do this after creating the rule conditions and adding points to it.
To enable a priority rule:
Launch the MSPbots app. Navigate to Apps and open NextTicket.Anchor step1 step1 - Click the priority rules link on the NextTicket tab.

- When the NextTicket Priority Rules tab opens, find the rule that needs to be activated and enable the corresponding switch.

The switch is enabled when it is green and disabled when it is
...
- grey
...
- .
...

Testing the Priority Rules
...
You can test the Priority Rules priority rules and verify if the resulting prioritization shows your expected outcome. You can do this test individually or all at the same timerules together.
A. To test a priority rule
- Do Steps 1 and 2 above.
- Click the eye icon corresponding to the priority rule for testing
...
- . This will preview the tickets list when the rule is applied.

- In the Test Passed Data window, review if the previewed ticket list shows your expected outcome.
...
Below is an example of a ticket list that applies a priority rule.


B. To test all enabled priority rules
The Test All button previews the prioritization of tickets based on the points assigned to all enabled priority rules. Click this button to verify if all the rules work together to show your expected prioritization. If the rules are not working as expected, review the points and continue adjusting until you achieve your desired outcome.
To test all priority rules:
- Do Steps 1 and 2.
- In the NextTicket Rules window, click the Test All button.
...

Below is an example of a ticket list that applies all enabled priority rules.

...

Saving a Priority Rule
...
...
You can To save a Priority Rule by doing the following:
...
from the NextTicket Priority Rule
...
window,
...
click the
...
Save icon corresponding to the rule.

Alternatively, you can navigate to Save on the upper right section of the page and select
...
Save All
...
.

...

Saving a Priority Rule as a Template
...
...
You can save priority rules as templates in the NextTicket Priority Rule window.
To save a priority rule as a template:
- Do Steps 1 and 2 at the start of this article.
- In the NextTicket Rules window, navigate to Save and select
...
Priority Rule can be save as a template by doing any of the following:
- In NextTicket Manager Priority Rule page: Click Save, then select "Save Rule as Template".

- Provide Template Name then click "Save".


2. MSPbots menu Panel, Go to Settings, then click Next Ticket Rule Template Management

a. Select Integration

b. Adjust and Enable Rules you wanted to choose then click Create new template button.

c. Input Template Name then click Save.

How to Delete a Priority Rule Template?
Priority Rule Template can be delete by doing the following:
- In MSPBots App Menu panel, select Settings then click Next Ticket Rule Template Management.
- Select Template to delete from the dropdown list
- Click Delete button then Confirm.


How to Request for a new Priority Rule?

- In the Save Rule as Template pop-up window, type a Template Name and click Save.

- Verify the creation of the new template by clicking the Template List dropdown. The name of your new template should now be on the list.

Deleting a Priority Rule Template
...
This is how to delete a priority rule template:
- Do Steps 1 and 2 at the start of this article.
- Go to the Default Template List and click the delete icon corresponding to the rule for deletion.

- Click OK when asked to confirm your deletion.

Requesting a new Priority Rule
...
- Do Steps 1 and 2 at the start of this article.
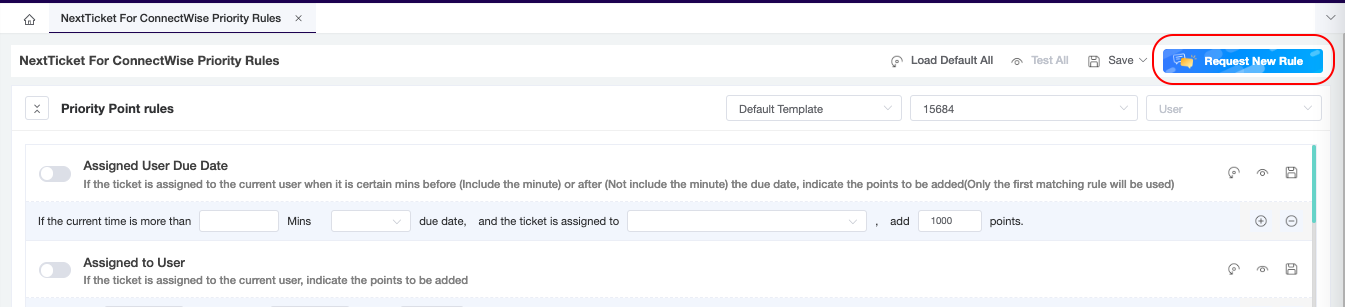
- Click the Request New Rule button.

- In Next Ticket Manager, go to Priority Rules page.
- Click Request New Rule button.
- Fill out the Request New Rule form then click submit Submit. The Your request will be forwarded to MSPbots support team to assess and check.
...
- the MSPbots Support Team.

Related Topics
...
| Content by Label | ||||||||||
|---|---|---|---|---|---|---|---|---|---|---|
|
Overview
Content Tools