 N O T I C E
MSPbots WIKI is moving to a new home at support.mspbots.ai![]() to give you the best experience in browsing our Knowledge Base resources and addressing your concerns. Click here
to give you the best experience in browsing our Knowledge Base resources and addressing your concerns. Click here![]() for more info!
for more info!
Page History
The New Attendance AppManager's work schedule templates make it simpler for allow administrators to establish create and assign work schedules to members individually or in a batch. When administrators need to set multiple work schedules, these templates are quite helpful.
This article is a . Assign work schedules to members
...
3. Click Add Button

4. Indicate the time for each day of the week and assign the corresponding time zone

5. Create a Name for the template.

6. The created template should reflect in the Template Setting

guide on how to:
| Table of Contents |
|---|
Anchor create create
Create a work template in the Attendance Manager
| create | |
| create |
- To start this process, open the MSPbots app using your Office 365 account and click Apps.

- Go to My Applications and look for Attendance.

- Open the Attendance App, go to Settings, and select Users Work Schedule in the dropdown menu.

- Click Template Setting on the Users Work Schedule screen.

- When the Template Setting screen opens, click the Add button.
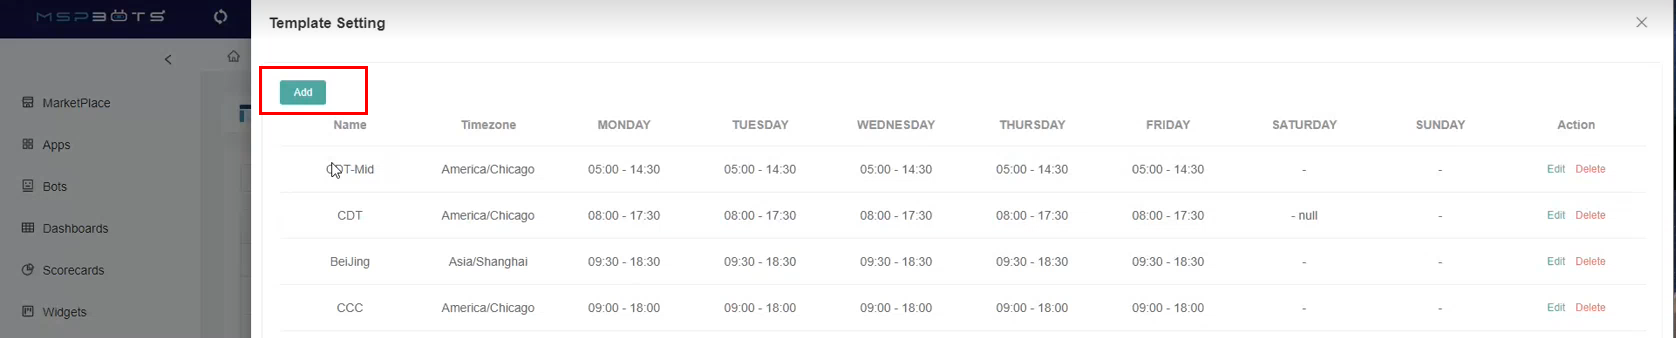
- Next, enter a Template Name.

- Assign a corresponding Time Zone for the schedule and select the Template Time for each day of the week. Create the settings based on the image below.

- Click Confirm to save the new settings. The created template should now appear in the Template Setting screen.

Assign a work template to a member
...
- Do steps 1 to 3 of the create a work template procedure.
- Apply a template to a user by clicking Edit
- on the right side of the member
...
- or employee’s name
...

8. Then click the drown down menu for the template to assign the specific Time or template
Click CONFIRM to save changes
b. Creating a batch work schedule
- Select the member you want to create a schedule for by ticking the check box corresponding to their name

- Click Batch Apply

...
- .

- Next, select a schedule from the Template dropdown menu or assign a specific time.

- Click Confirm to save and apply the changes.

Assign a work template to a batch
- Do steps 1 to 3 of the create a work template procedure.
- Select the members that need a schedule by ticking the checkboxes corresponding to their name.

- Click Batch Apply.

- Click the Template dropdown menu and select a template.

- Click Confirm to save and apply changes.

| Content by Label | ||||||||||||
|---|---|---|---|---|---|---|---|---|---|---|---|---|
|
...
Overview
Content Tools